
While working at a late Neolithic mortuary site in Portugal, my friend Anna and I would frequently joke that we were excavating the ‘burial of the feet’, because it seemed like every day on site we chanced upon a new navicular. The site wasn’t actually an ossurary where elements were deliberately sorted spatially – in contrast, our joking and obsessive attention to tarsals were likely brought about by too many days excavating under the intense Iberian sun. Or, it may have had something to do with the traditional Iberian cuisine we’d eat for lunch. For some reason, the Portuguese are huge fans of rice and cod, particularly when it is 40˚C. Ah, the gentle warmth of an Iberian summer. But I digress. Foot bones do have a tendency to preserve particularly well in the archaeological record, and it is important to be able to identify and side them, especially if you’re dealing with commingled remains. After spending a lot of time blankly staring at various tarsals, in lab settings, in settings where the bones are covered in dirt, or in settings where I am covered in dirt, I think I’ve finally come up with some reliable tricks.
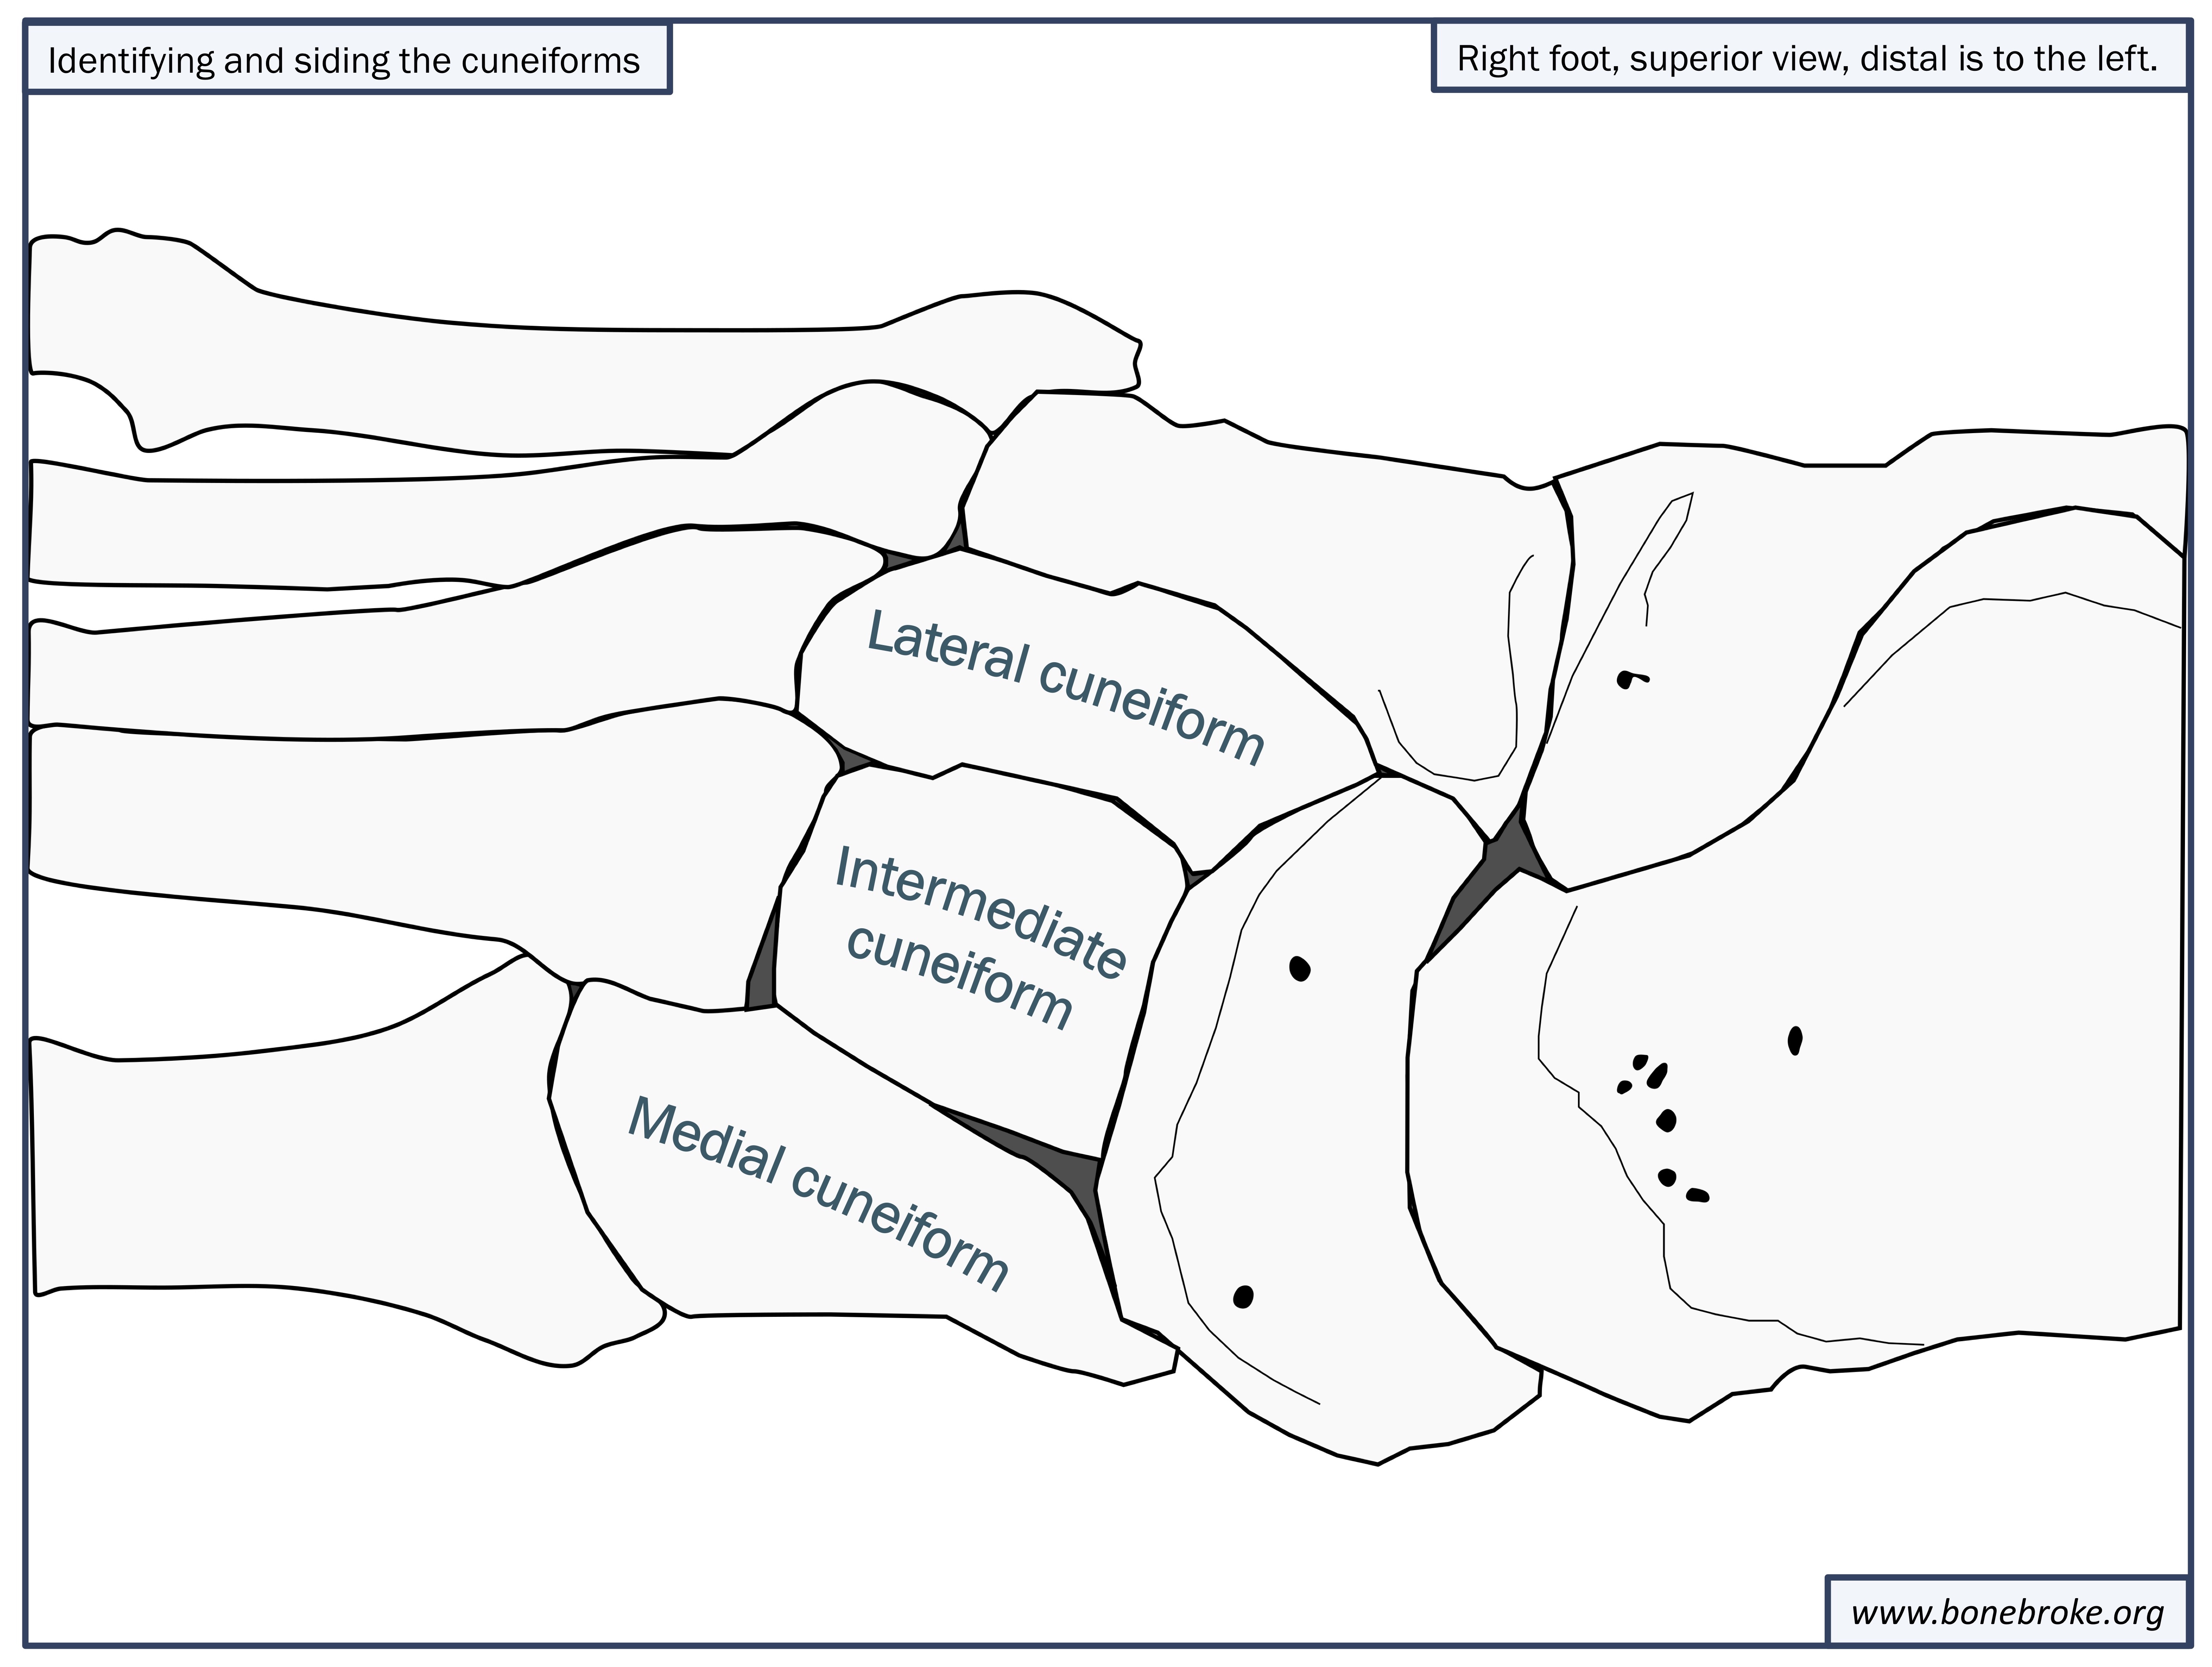
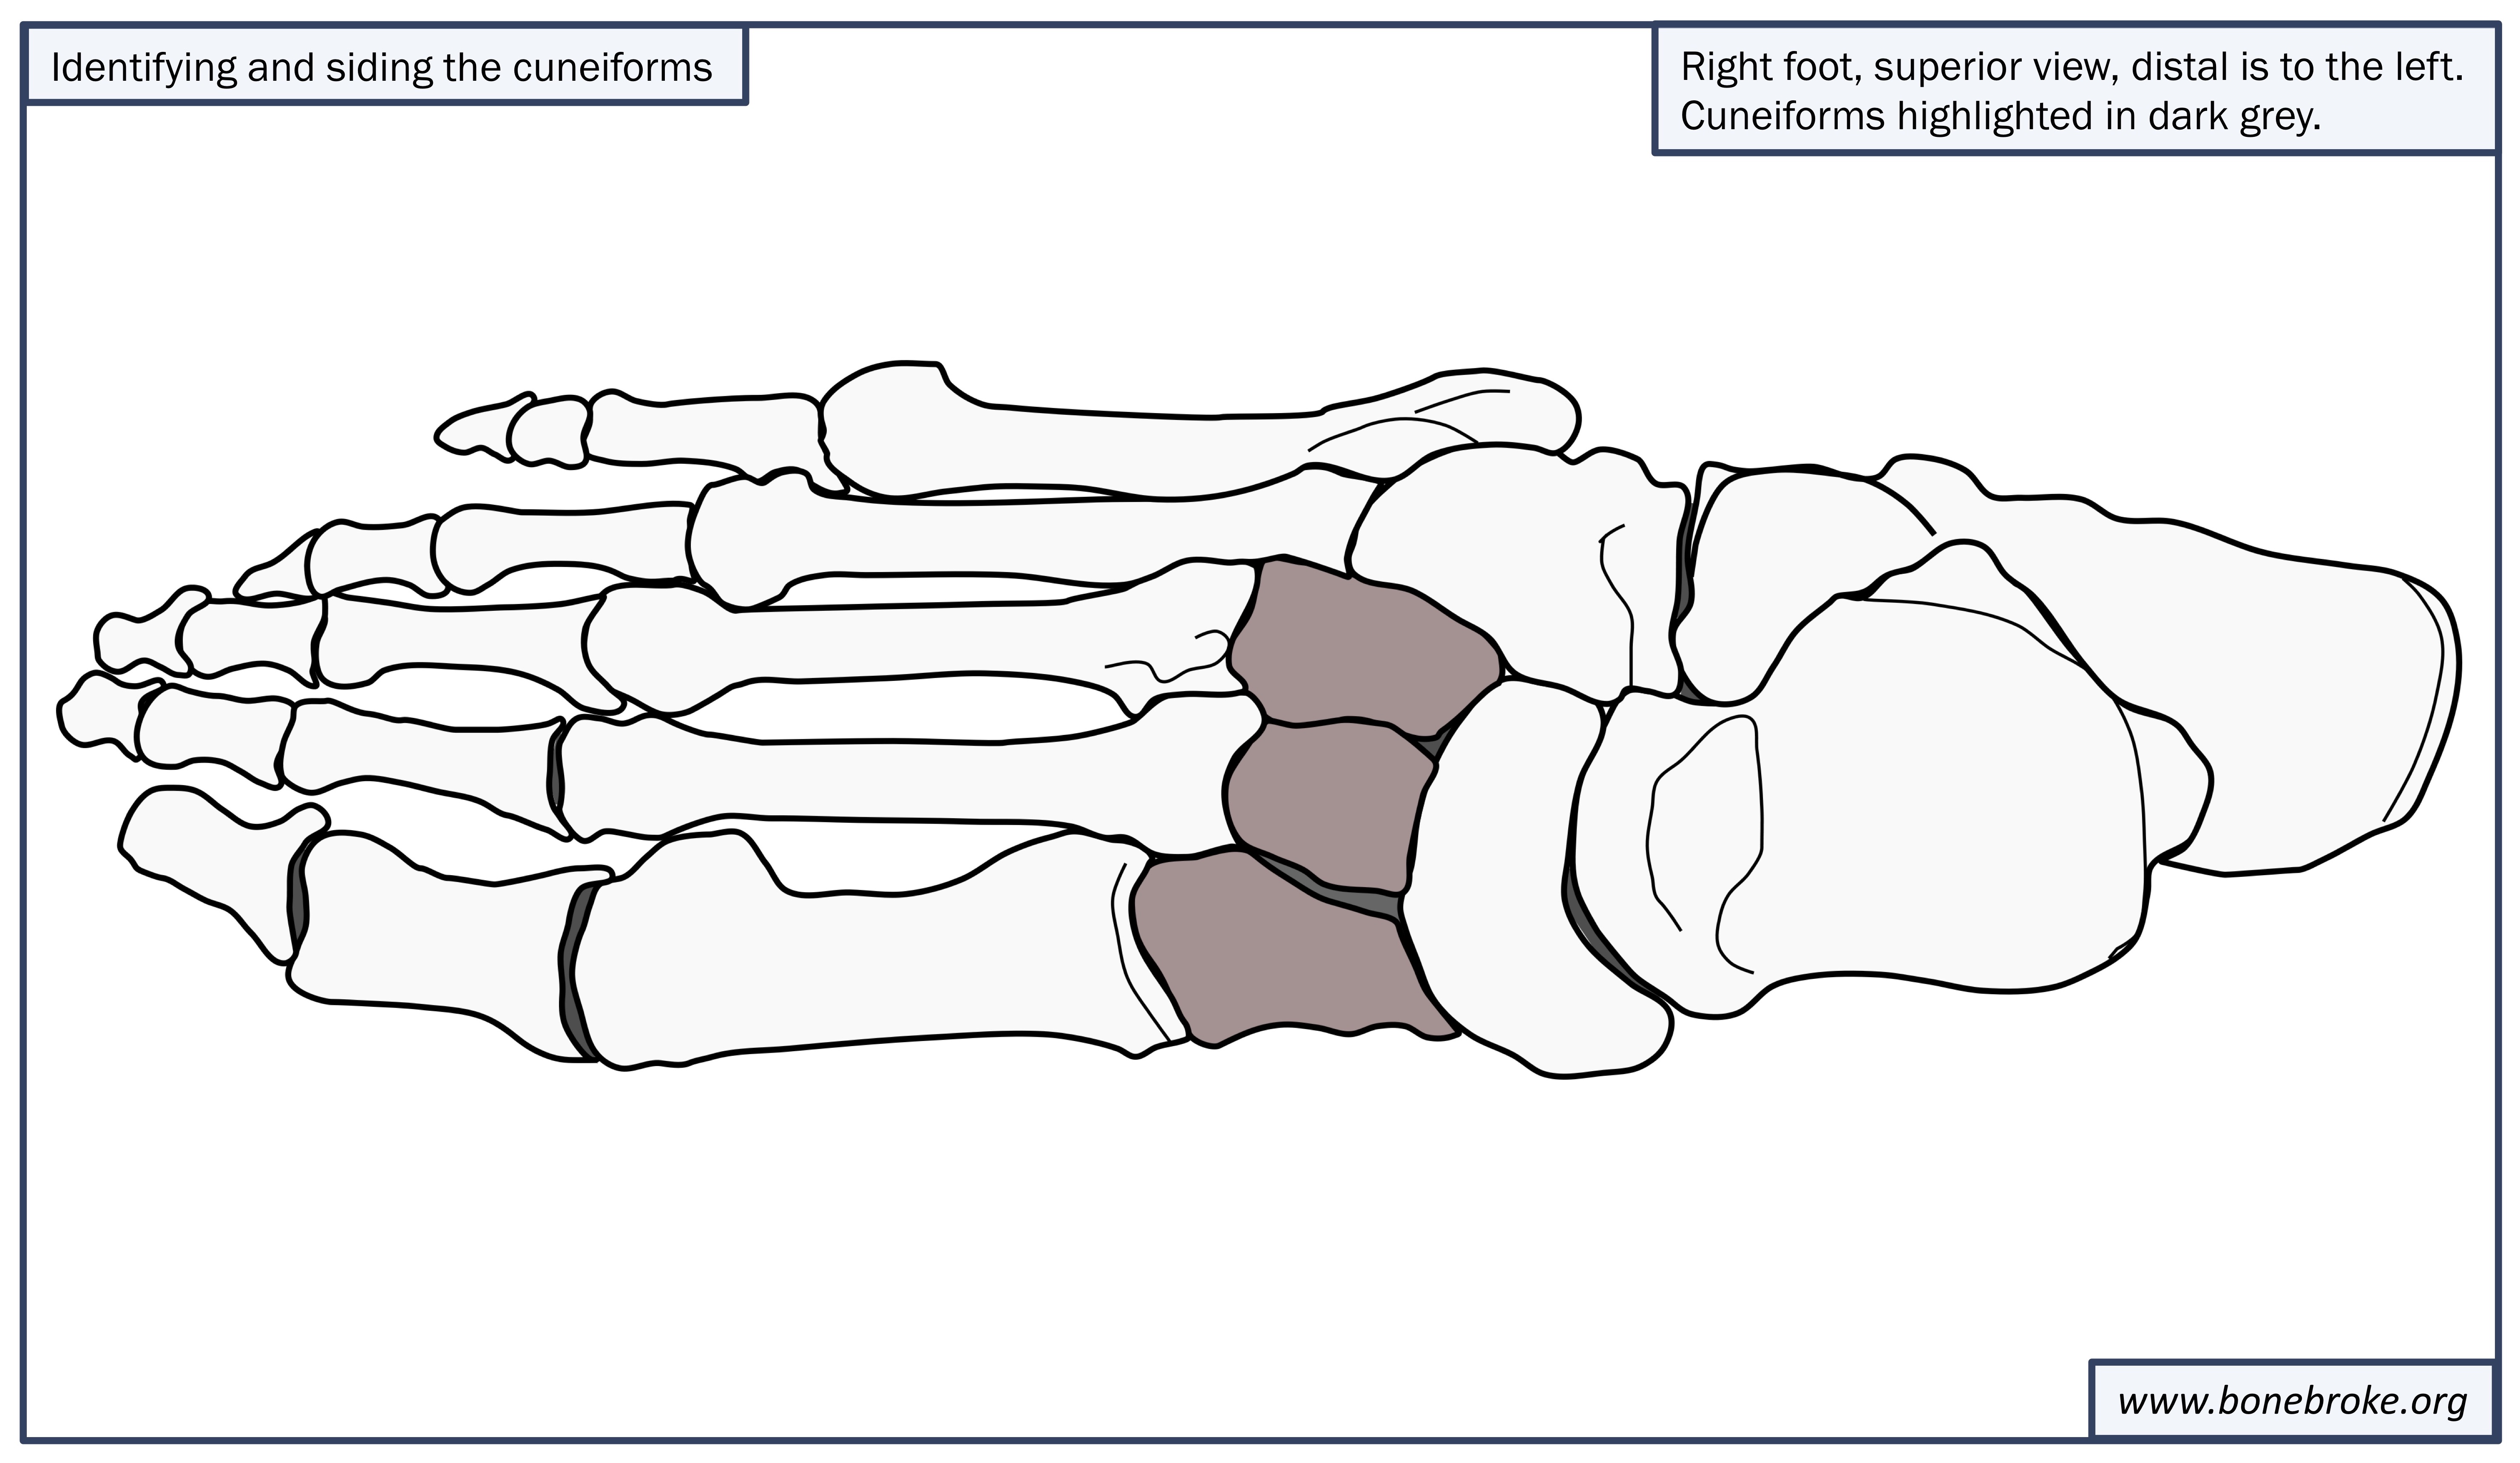
To start off with, there are three cuneiforms, all of which articulate proximally with the navicular and distally with the metatarsals. The lateral cuneiform also articulates laterally with the cuboid. I’ll address them one by one.
I. The Medial Cuneiform:
Identification: Unsurprisingly, the medial cuneiform is the most medial of the three tarsals – as per usual, anatomists for the win when it comes to terminological creativity. It is also the largest of the three bones, and exhibits a relatively gentle curvature. The most convex point of its arc is medial.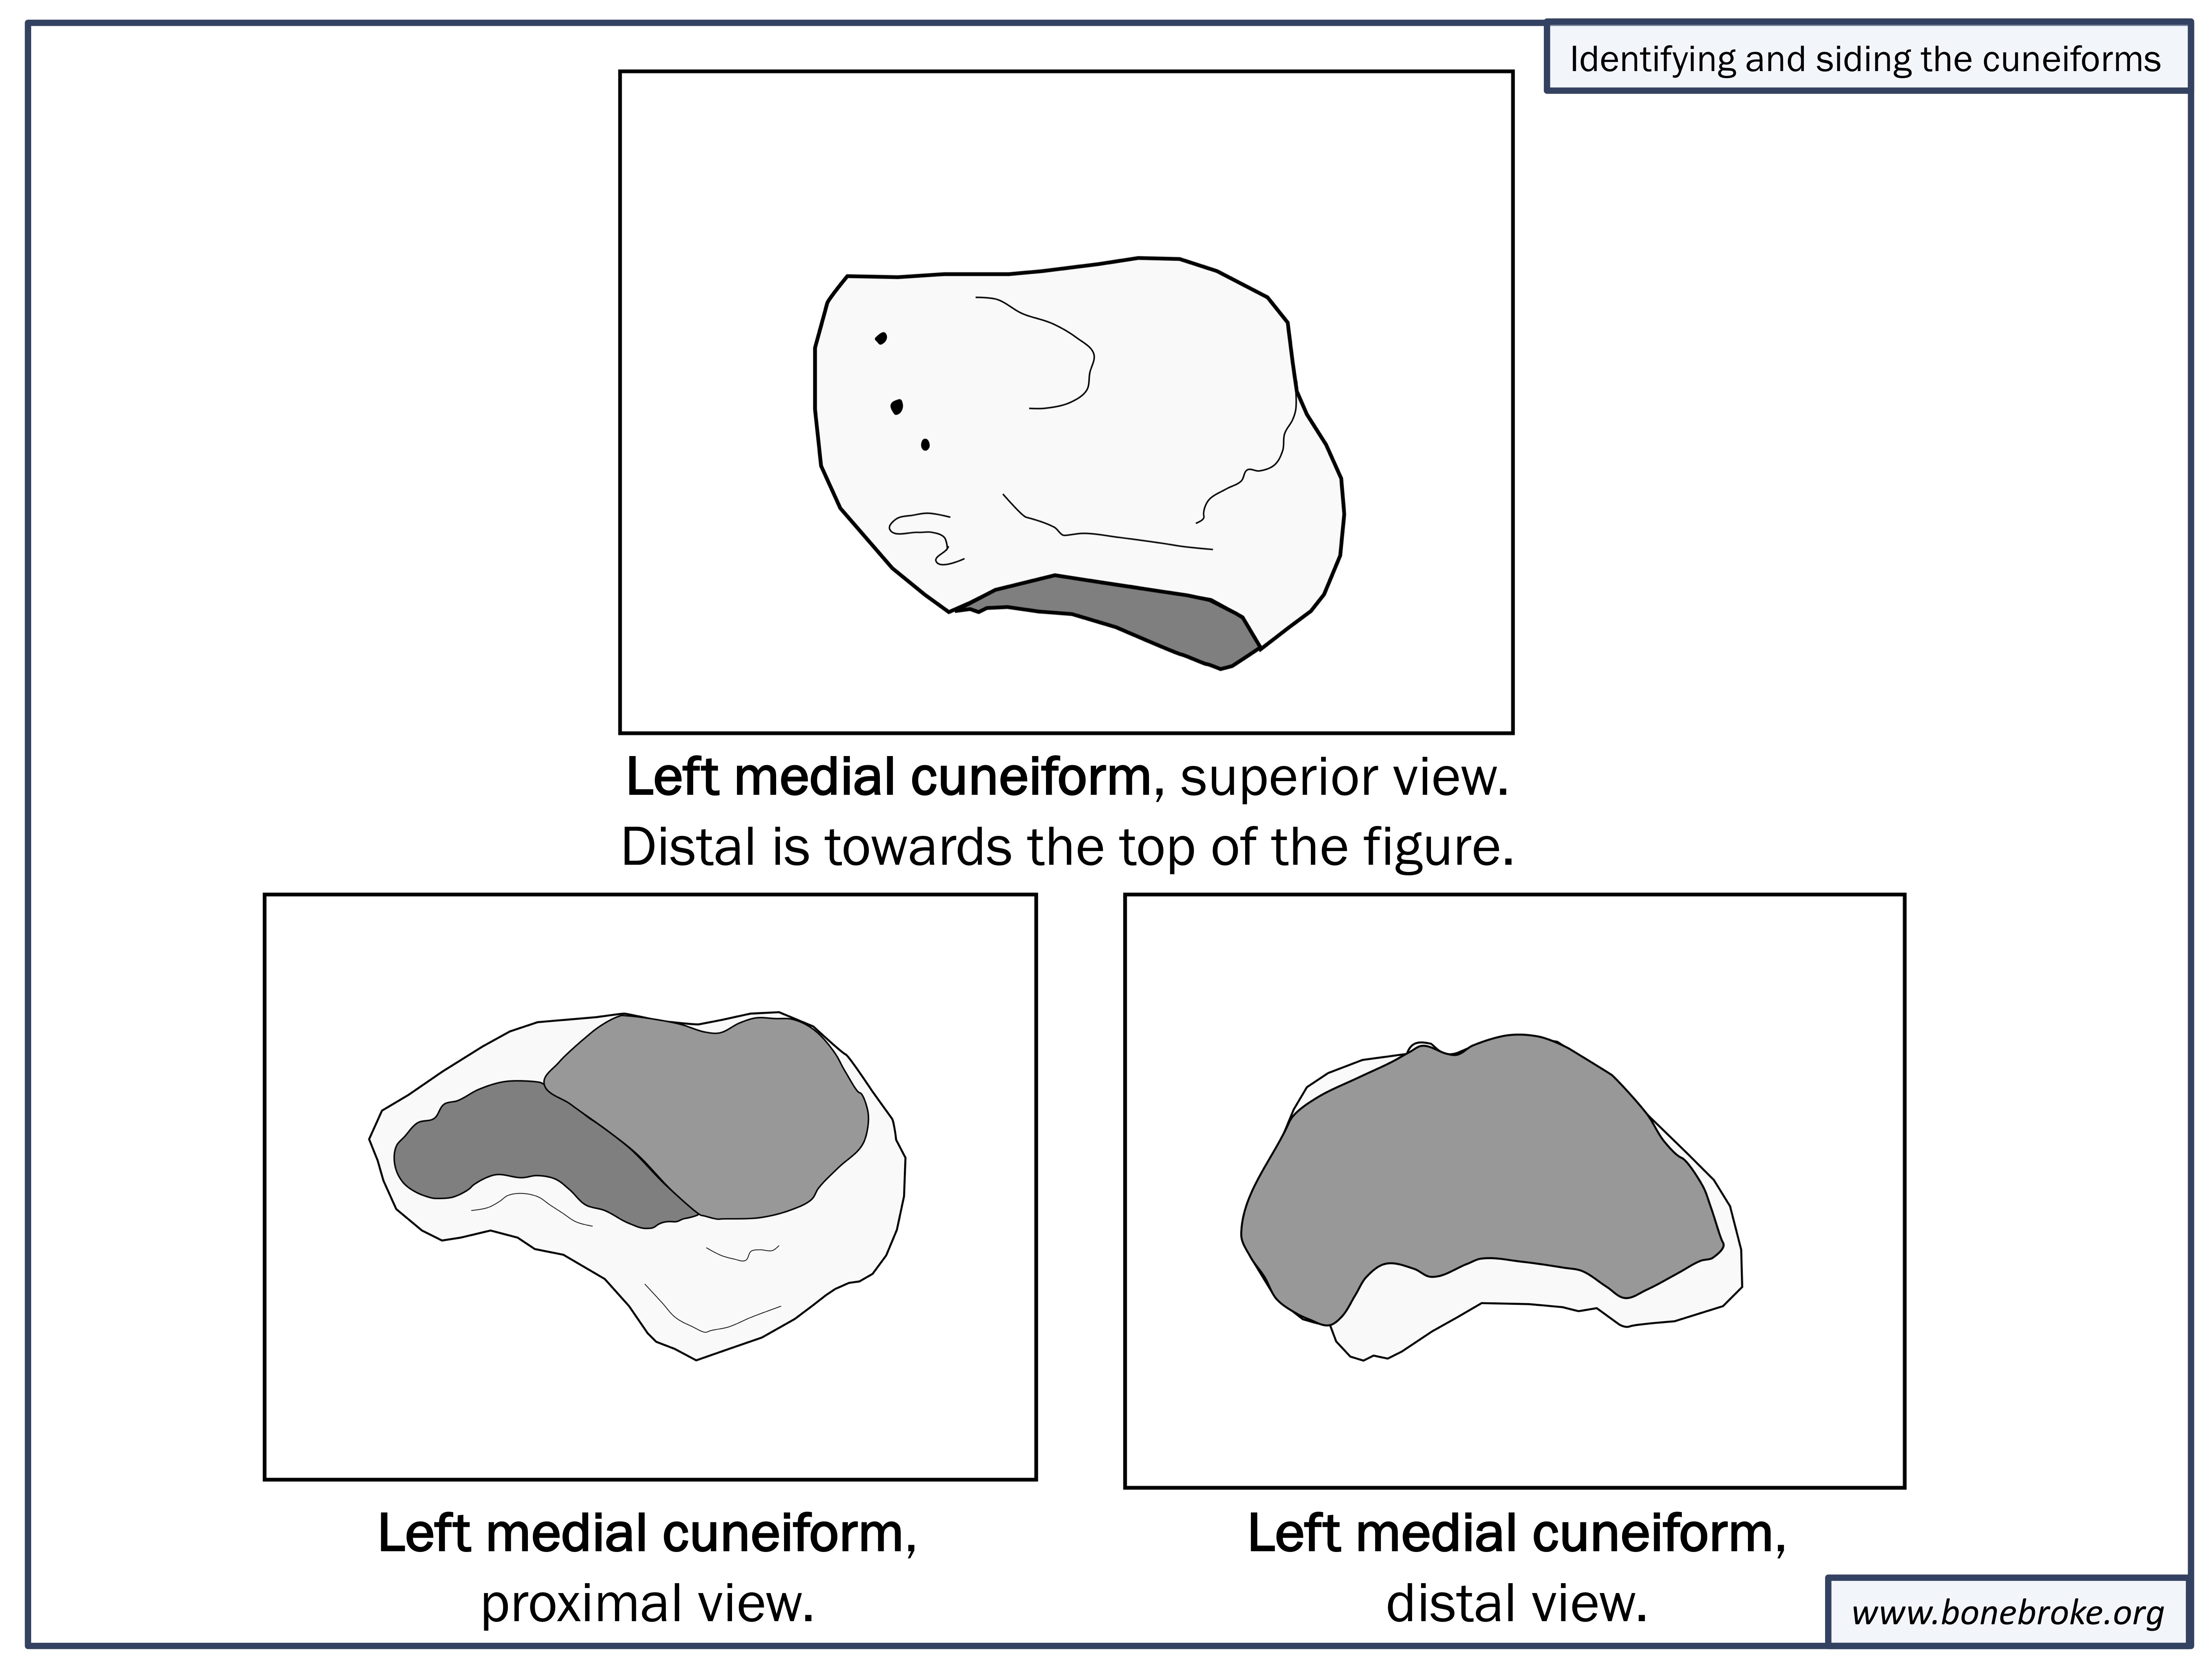
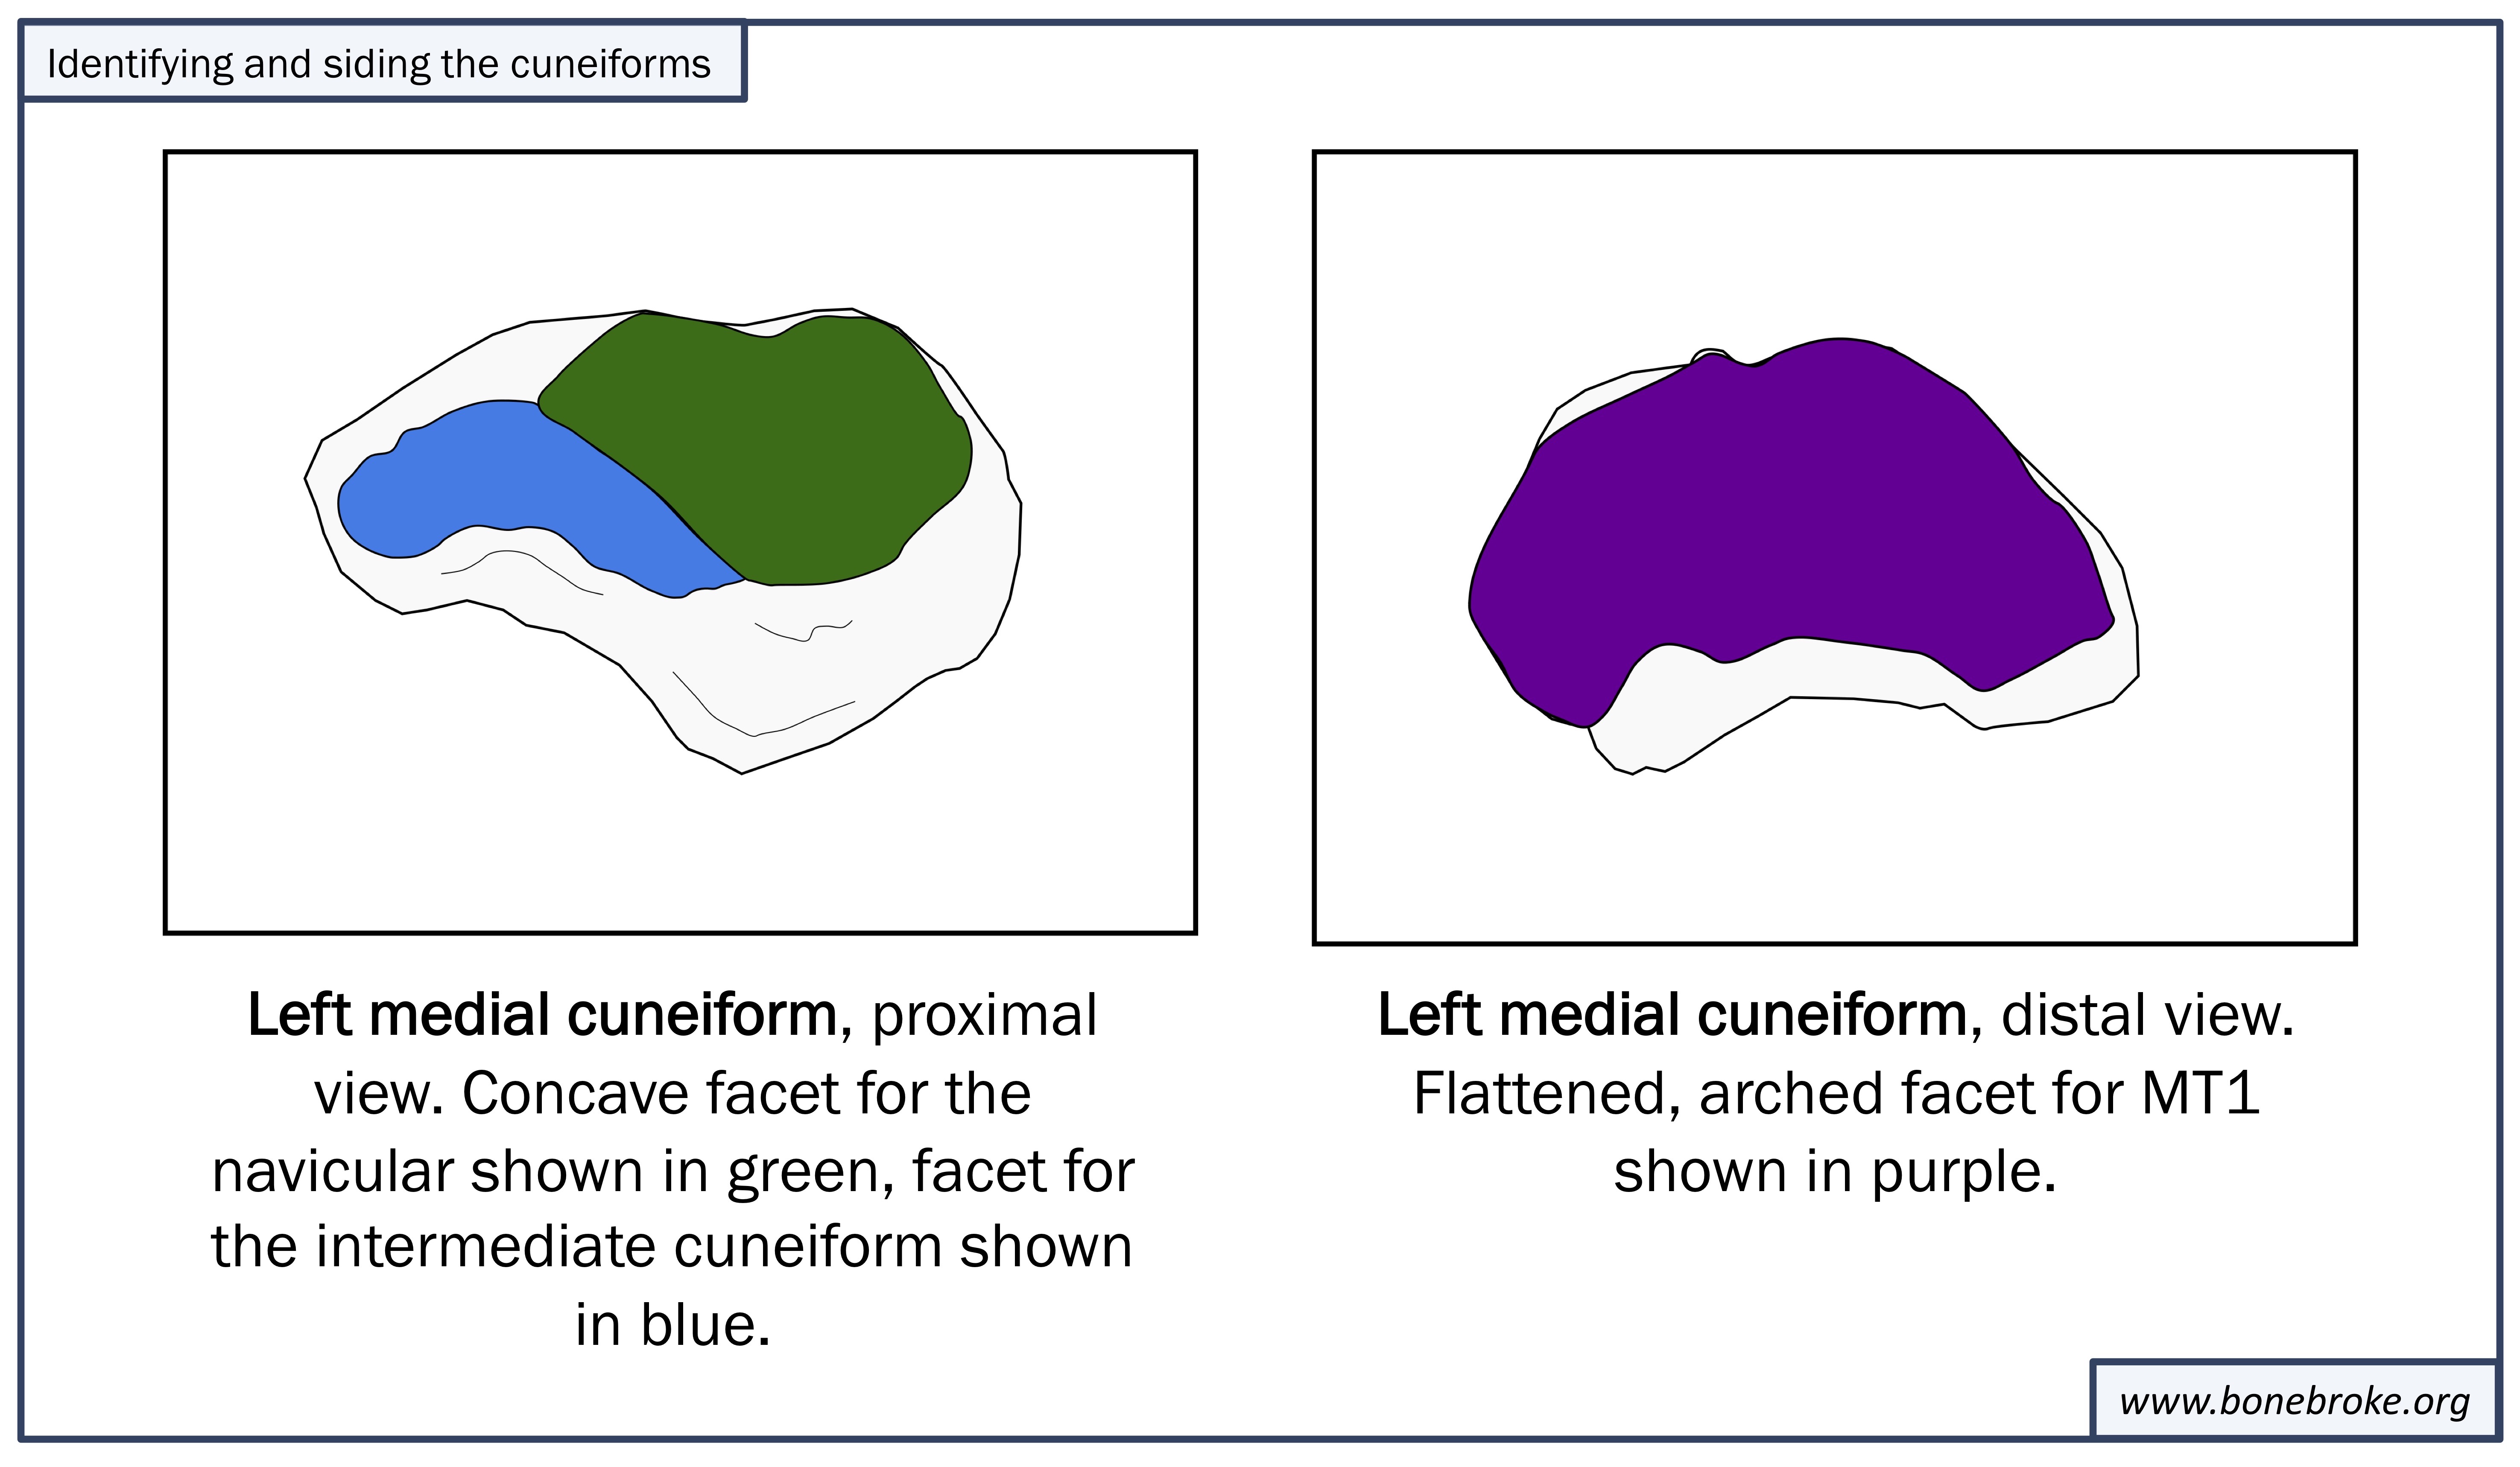
The medial cuneiform has two proximal articular facets – the larger, concave facet is for articulation with the navicular, while the smaller, more distally placed facet is for articulation with the intermediate cuneiform. It also has one distal articular facet, for MT1, which is flattened and shaped like a chunky rainbow. Its superior surface is rugose, while its inferior surface is marked by a thin irregular articular facet (for the articulation with the intermediate cuneiform).
Siding: Orient the medial cuneiform so that the distal articular facet is facing away from you, and the superior surface is facing up. If it is from the left, your left thumb will easily fit into the concave articular facet for the medial cuneiform. If it from the right, your right thumb will. The longer facet for the intermediate cuneiform will slide along the inferior surface of the bone, towards the side the bone is from. You can grip the cuneiform with something like a grip you’d use on bike handlebars, with your thumb fitting into the articular facet for the navicular.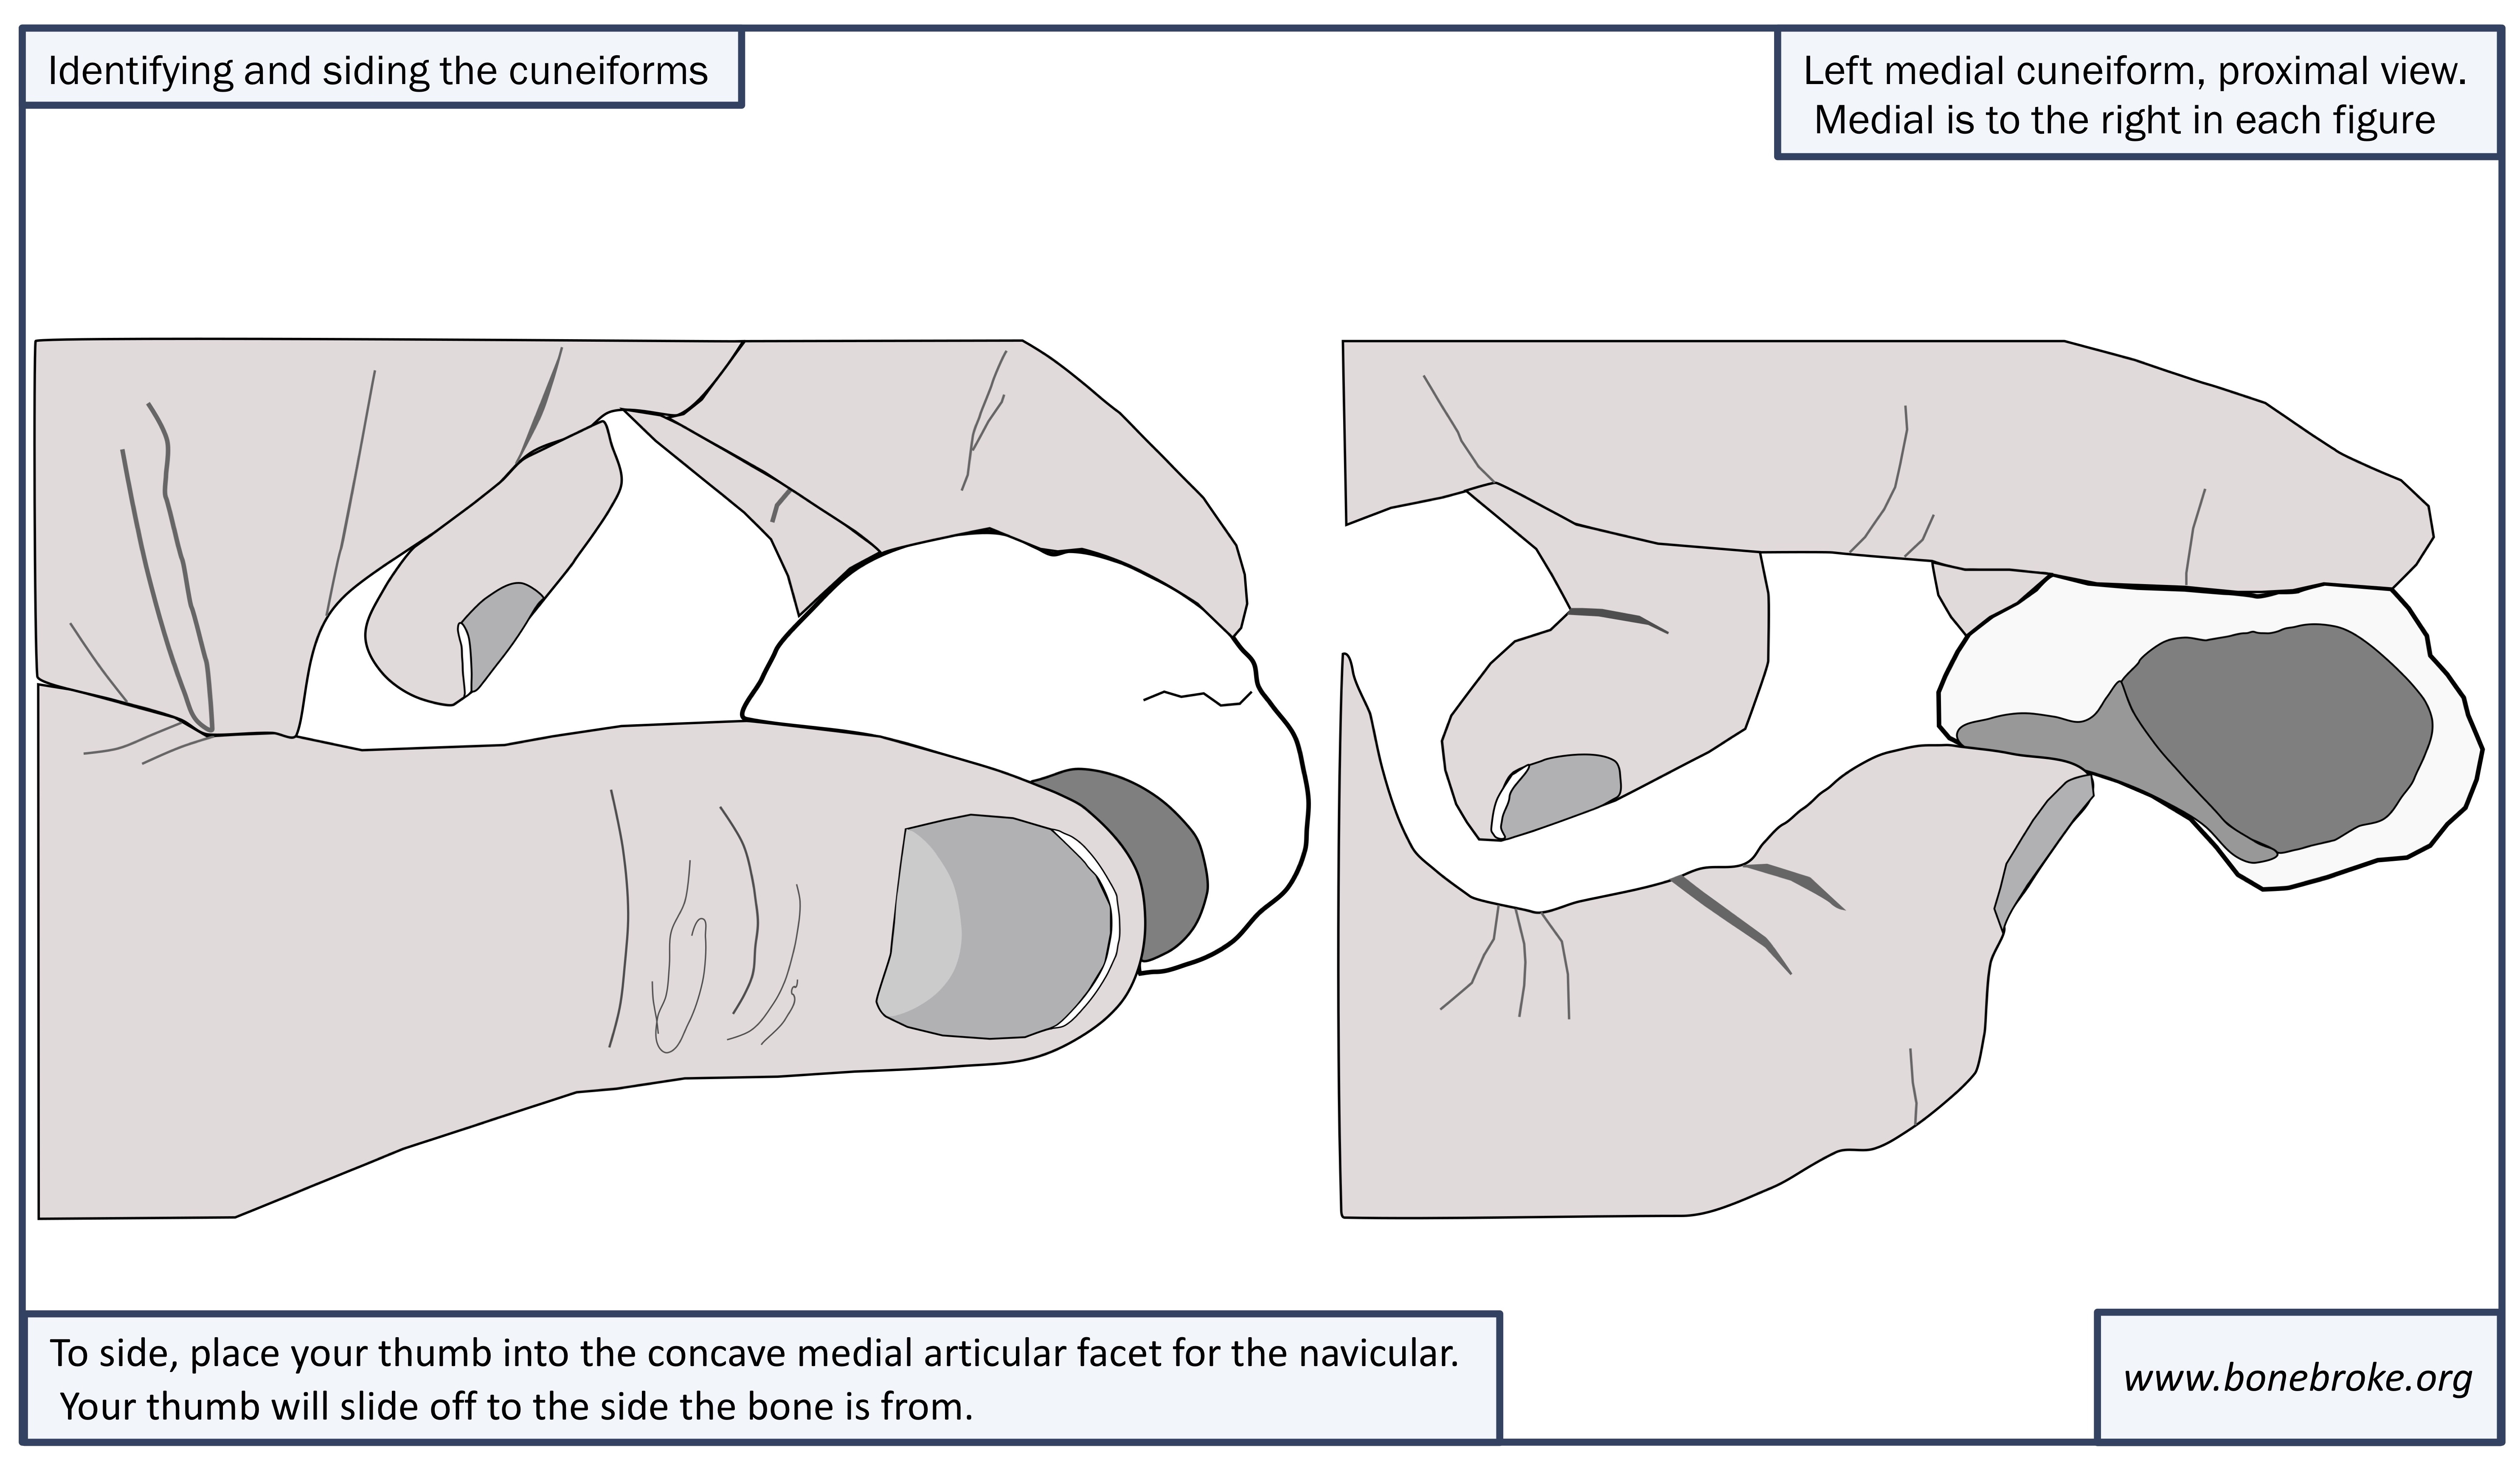 II. The Intermediate Cuneiform
Identification: The intermediate cuneiform is the smallest of these three tarsals. It has a very boxy profile in superior view, and readily visible proximal and distal articular facets. It is easily distinguished from the medial cuneiform due to its overall shape. While the medial cuneiform is a chunky arc, the medial cuneiform is more of a squat triangle. Similarly, it can be distinguished from the lateral cuneiform because it has a much more square shape in superior view.
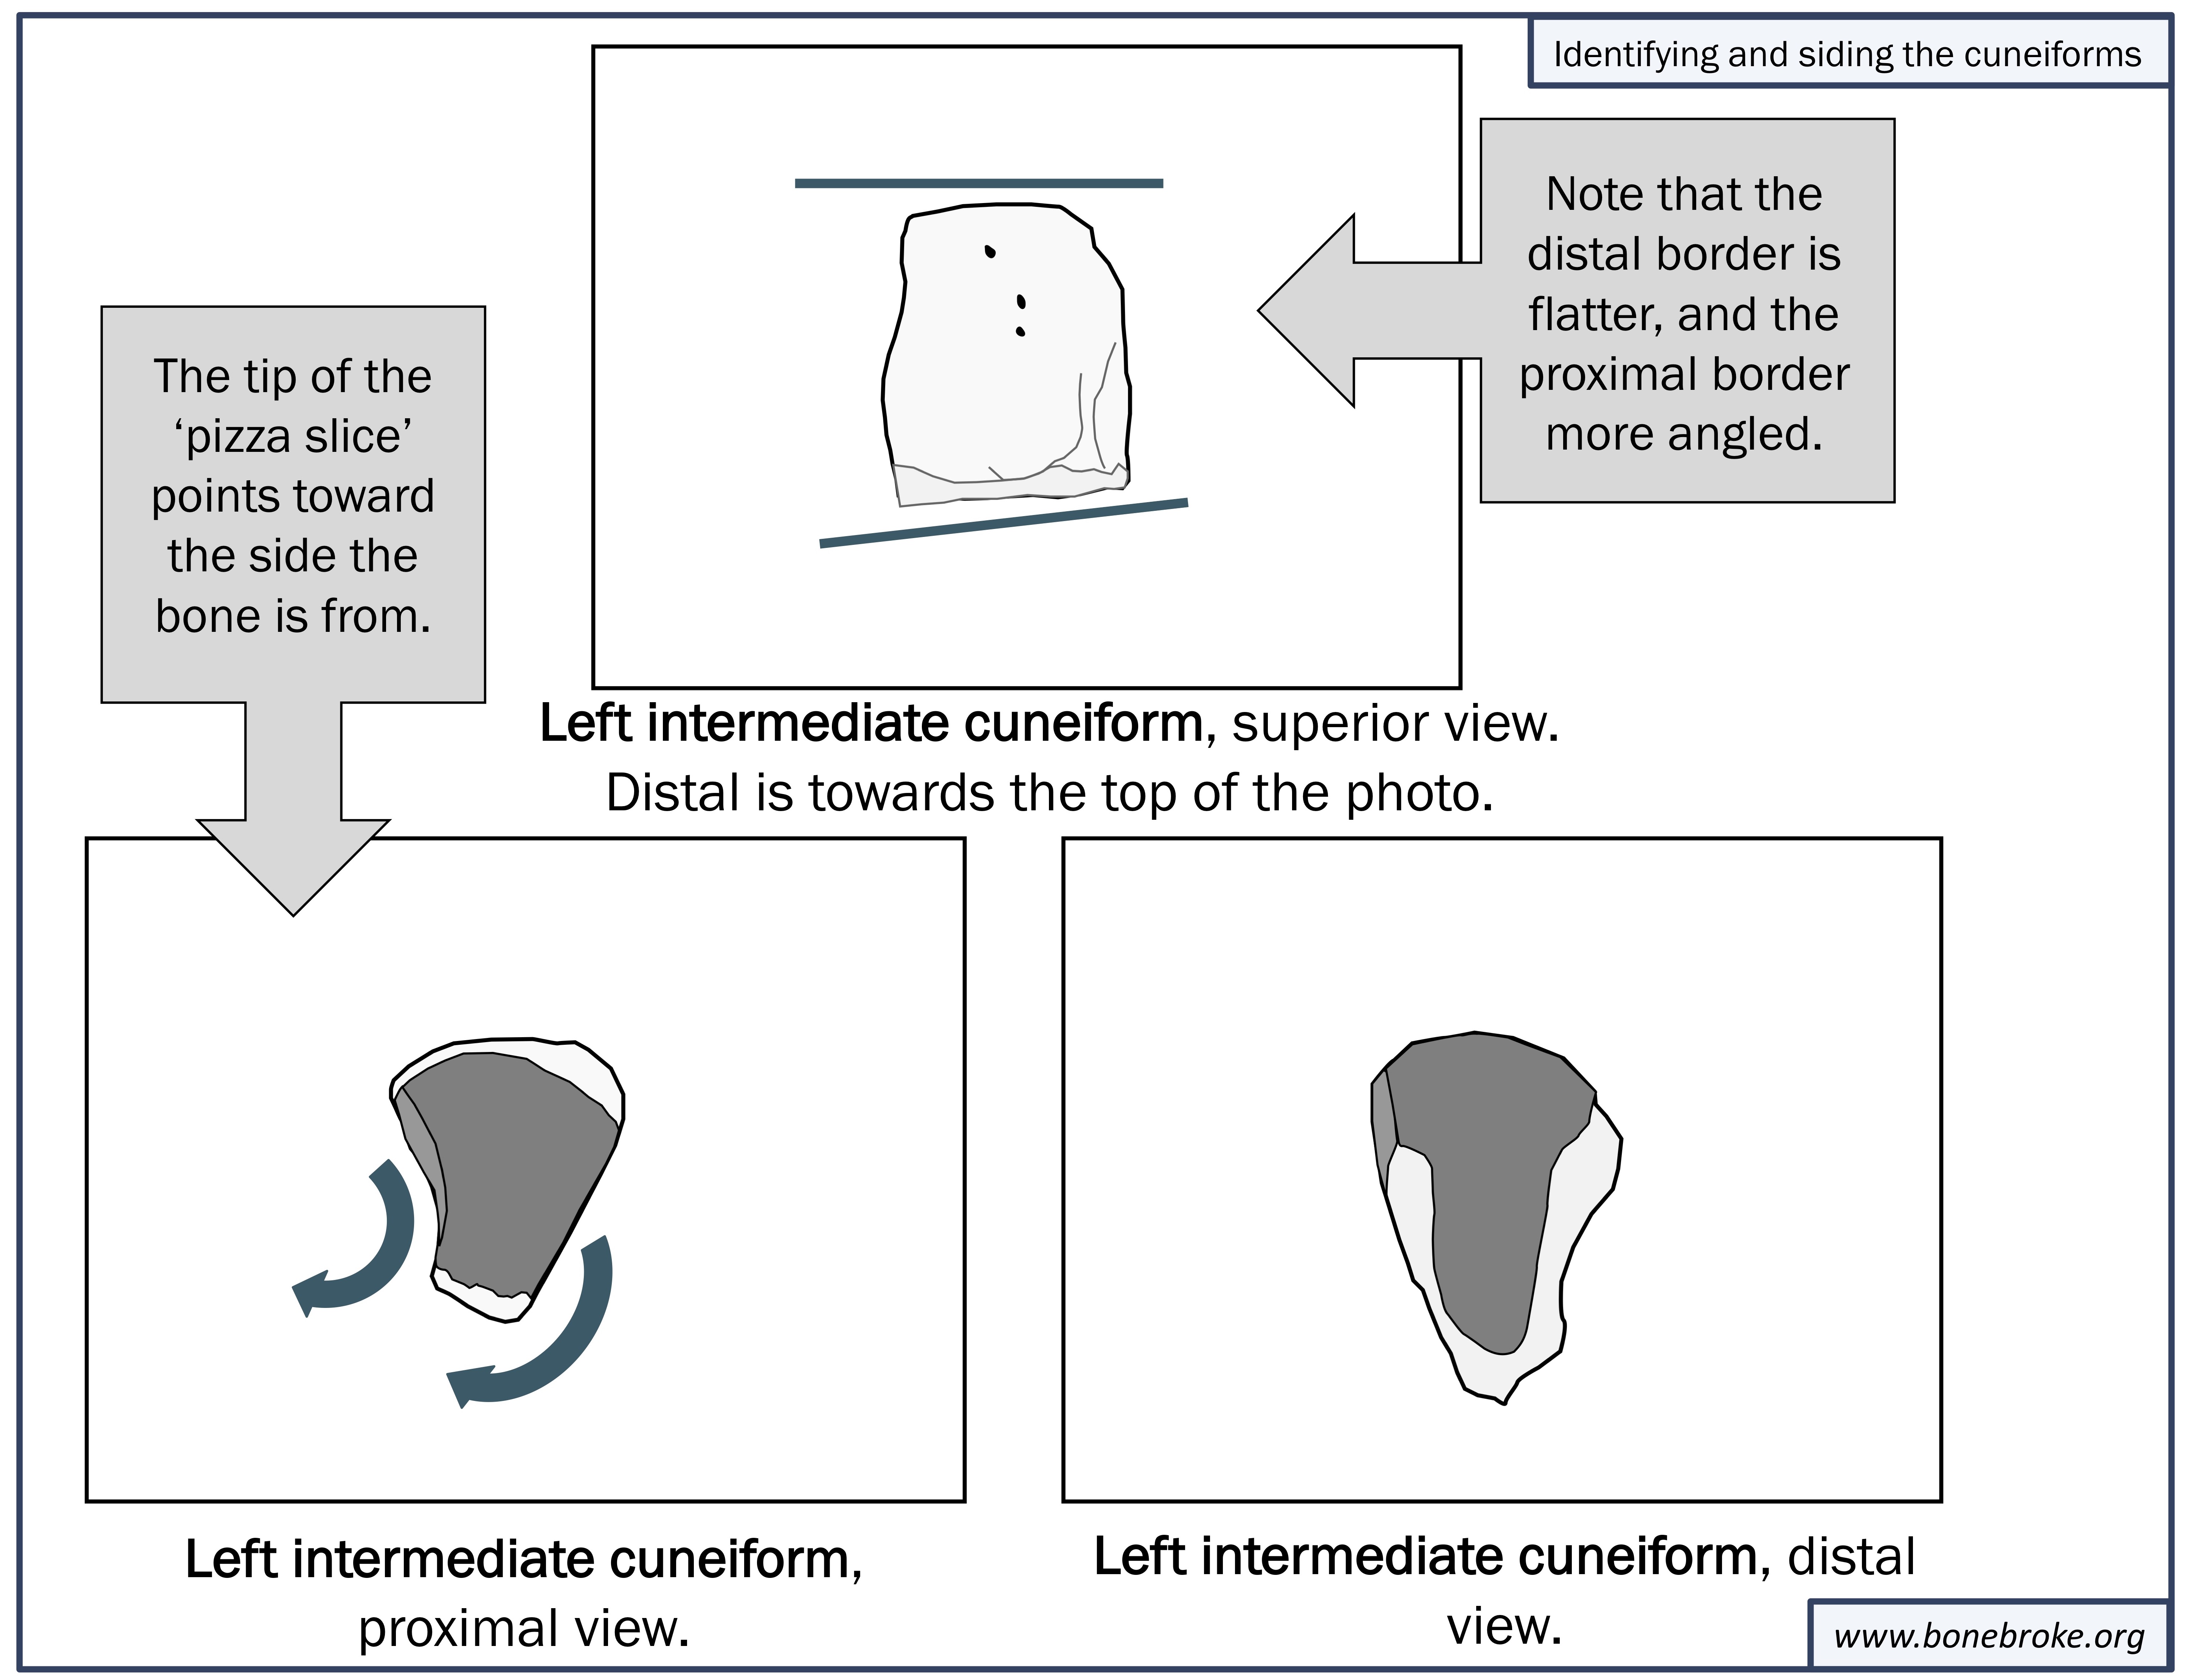
Siding: If you’re looking at the cuneiform in superior view, the shortest side of the ‘square’ will be distal. The proximal articular facet for the navicular looks like a slice of pizza, while the distal articular facet resembles a sickly South America. I don’t really bother with the distal articular facet because its orientation is much more variable than that of the proximal articular facet. The tip of the proximal articular facet will point towards the side the bone is from. The lateral articulation for the lateral cuneiform is bilobate, and shaped a little bit like Mickey Mouse ears (though depending on normal osteological variation, they may look like Mickey Mouse ears as drawn by Salvador Dali). The medial articulation for the medial cuneiform consists of a straight vertical strip followed by a more superior horizontal one – it looks rather like a forearm and fist ready to punch. III. The Lateral Cuneiform
Identification: In superior view, the lateral cuneiform has the most rectangular outline, and it is intermediate in size between the first two cuneiforms. Of the three tarsals it has the most irregular shape. Overall it is triangular in form, but it is a much less delineated triangle than the intermediate cuneiform. If you place it on a table so that the inferior end is pointing up, it looks rather like a melting Hershey’s kiss.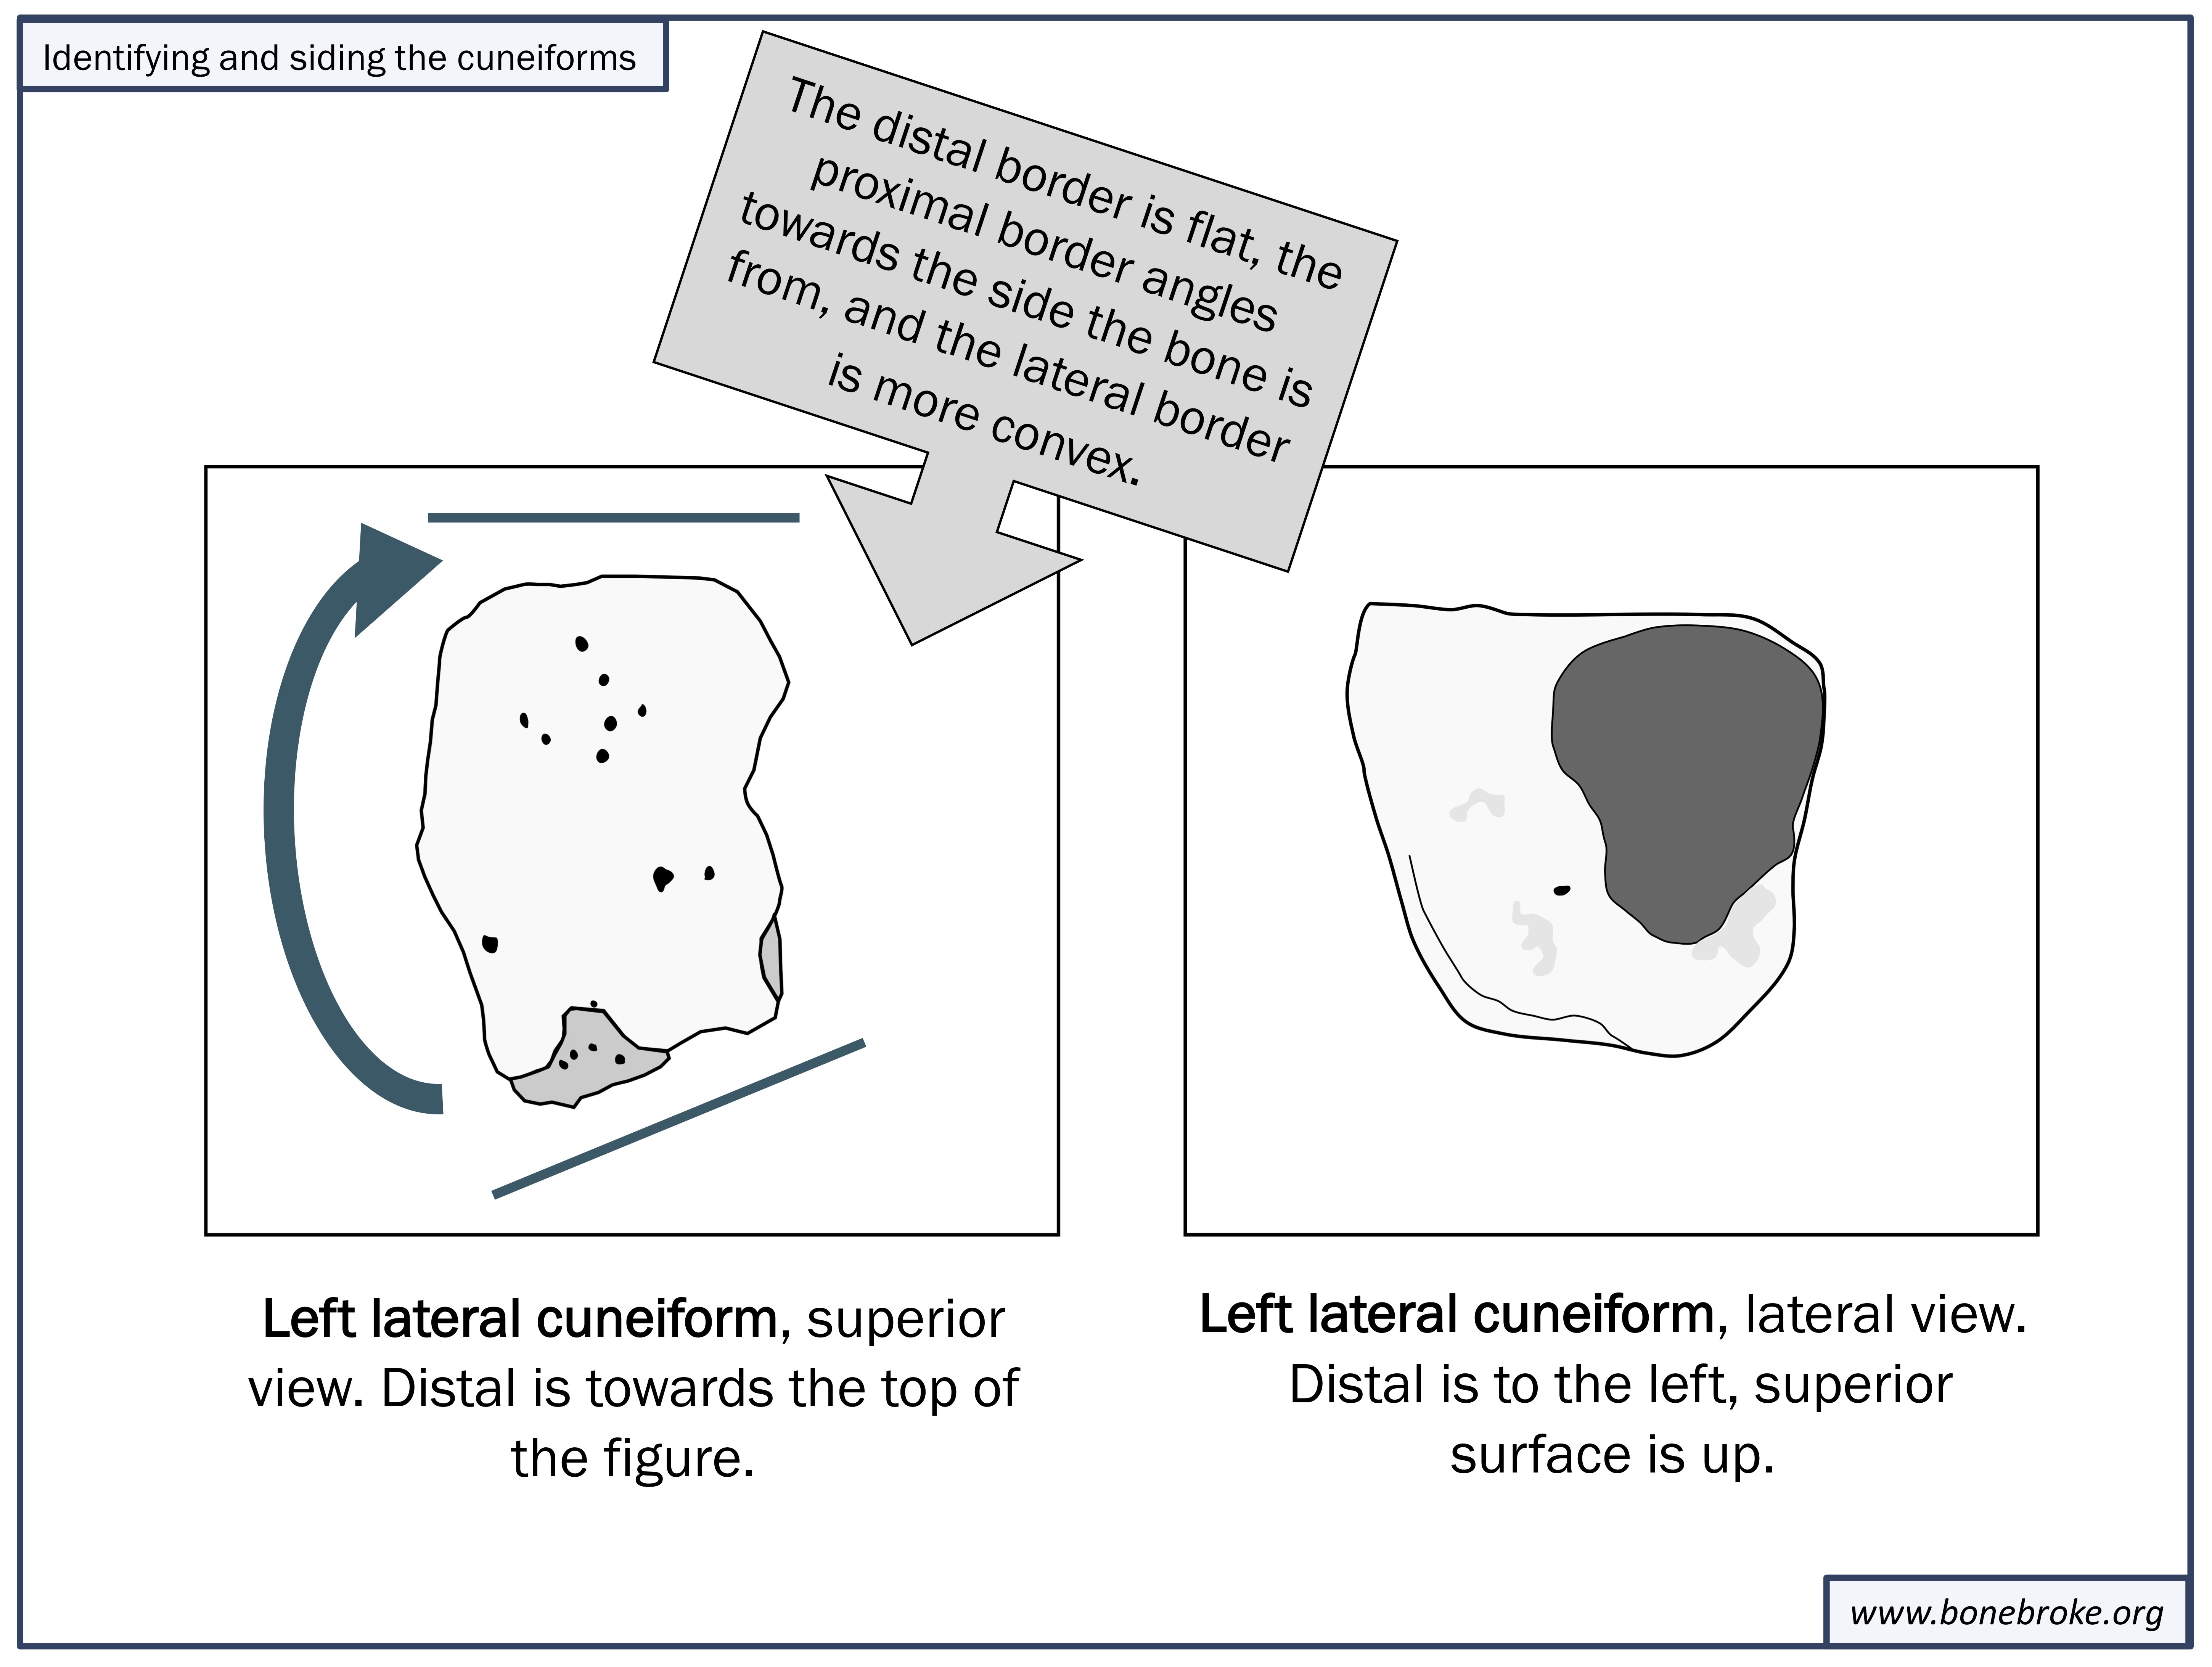
Siding: One of the easiest ways to side the lateral cuneiform is to use its superior surface. Orient the bone so that the superior surface is up. Place the distal, flat edge of the ‘rectangle’ flat against your index finger. The opposite proximal edge will angle laterally and towards the side the bone is from. In superior view, the outline will often appear more concave medially and more convex laterally, as if it were hugging the intermediate cuneiform. Finally, the most helpful articular facet for siding is the lateral articular facet for the cuboid, which occurs as a well delineated round shape on the upper half of the lateral side of the bone.
And there you have it. Everything you always wanted to know about the cuneiforms but were afraid to ask. Happy Thorsday, everybody.
Looking for more information on the tarsals? These Bones of Mine provides a solid overview post of the entire foot here.
Image credits: All bones are traced from photographs which were taken using the teaching collections housed in the osteology/paleoanthropology lab at the University of Michigan. The first image is traced from an image available at thinglink.com.


Such a good guide! Thanks.
LikeLike
Full of admiration! Top blog post!
LikeLike
Pingback: Blogging Archaeology: January | Bone Broke
oh great post. will help with my lower anatomy practical tomorrow.
LikeLike
Thanks! Good luck on your practical.
LikeLike
you are my goddess part II
LikeLike
Hello again Evgenij! There’s a lot more tarsal posts up in the rest of the blog, if you’re still looking for tips – just select “tarsals” under the categories menu in the right-hand panel.
LikeLike