Thumbs Up: The muscles that insert on the thumb

Bernard Wood recently came to give a talk at Michigan.  While he was discussing  the utility of the concept of genus for thinking about human evolution, he mentioned something I found interesting.  Wood referenced a research project on anatomical homologies and homoplasies in the soft tissue of the head, neck, pectoral region and upper limbs of extant primates, and mentioned that humans often weren’t as unique as you might think. He noted that even lizards have more extrinsic muscles in their hand than humans, which ran contrary to the expectations of most people in the audience. The real anatomical difference in humans, Wood underscored, is in how many muscles go to the thumb.

Photo on 13-10-05 at 9.23 PM

And actually, the musculature surrounding your thumb is more complicated than you might think. I know exactly how many muscles insert onto that digit, because I had to memorize their names and attachment sites for anatomy written exams. That can’t be too bad, I hear you thinking. There’s likely a flexor and an extensor, right? Maybe two or three muscles?

EIGHT. EIGHT MUSCLES INSERT ONTO THE THUMB. That still doesn’t sound so bad, until you realize that there are 19 intrinsic and extrinsic muscles that insert onto the hand alone. Dr. Harry Maisel, who guided me through Human Gross Anatomy, was adamant that we know where each of these muscles attached to the thumb, as well as what their action was. The best way to learn all of this, I found, was to draw out a schematic picture. Below, you’ll find poorly drawn outlines of MC1, the proximal phalanx and the distal phalanx, and approximations of the muscle attachment sites themselves.

Thumb (Ventral)

Thumb (Ventral)

Flexor Pollicis Longus: Origin: Anterior radius and interosseous membrane. Action: Flexion of distal phalanx of thumb + proximal phalanx. Innervation: Median nerve (C7, C8+T1).

Adductor Pollicis: Origin: Oblique head = bases of MC2, MC3 + Capitate. Transverse head = anterior surface of MC3 body. Action: Adducts proximal phalanx towards MC3. Innervation: Deep branch of ulnar nerve (C8 +T1).

Flexor Pollicis BrevisOriginSuperficial head = Flexor retinaculum + Trapezium. Deep head = Floor of carpal canal. Action: Flexes proximal phalanx of the thumb at MCP joint. Innervation: Recurrent branch of median nerve (C8 + T1).

Abductor Pollicis BrevisOrigin: Flexor retinaculum, scaphoid + trapezium. Action: Abducts thumb at CMC and MCP joints. Innervation: Recurrent branch of median nerve (C7+C8).

Opponens PollicisOrigin: Flexor retinaculum and trapezium. Action: Pulls and rotates MC1 across palm (opposing it against fingers). Innervation: Recurrent branch of median nerve (C8 + T1).

Thumb (Dorsal)

Thumb (Dorsal)

Extensor Pollicis Longus:Origin: Posterior ulna (middle third) and interosseous membrane. Action: Extends distal phalanx of thumb at MCP and interphalangeal joints. Innervation: Radial Nerve (C7+C8)

Extensor Pollicis Brevis: Origin: Posterior surface of radius and interosseous membrane. Action: Extends proximal phalanx of thumb at MCP joint (and can also extent MC1 at CMC joint). Innervation: Radial nerve (C7 + C8).

Abductor Pollicis Longus: Origin: Posterior surface of ulna, radius and interosseous membrane. Action: Abducts, extends and laterally rotates the thumb at  CMC joint. Innervation: Radial nerve (C7 + C8).

One thing that can make life easier when learning about the muscles of the hand is remembering that everything that inserts onto the dorsal surface of the thumb is innervated by the posterior interosseous branch of the radial nerve (C7 + C8)! Another good way to break things down is to remember that the pollux has  two flexors, two abductors, two extensors (a longus and a brevis for each), and then an adductor and an opponens. So that narrows down eight insertions down to only five, especially if you’re trying to make sure you’ve covered them all!

A final thing that will make life easier is some templates to practice with. I’ve provided two blank outlines and two outlines with the insertion sites on them below, for you to print out and use when studying.

Thumb – unlabelled

Thumb – labelled with insertions

References: Lest you think I am this sort of prodigy, I diligently checked all of the muscle origins, actions and innervations using my set of Netter’s Anatomy Flashcards – 3rd edition (Sidebar: They have a KINDLE EDITION now! Insta-wishlist!). E-Hand is also useful for  studying.

Good luck with the hand!

Posted in Anatomy, Hand, Muscle Attachments | Tagged | 1 Comment

Orienting and Siding ‘Regular’ Ribs

I’ll begin by admitting that ribs are some of my least favorite bones to deal with.

[Sidebar: I took a  week-long forensic anthropology overview course once (the 25th year of this), and I was astonished at the extent to which forensic specialists rely on the ribs for estimating age. Isçan and colleagues provide one of the best-known methods for doing so, but using it requires  you to identify the sternal end of the fourth rib. This sounds promising, until you realize that ribs from prehistoric contexts often look like this:

I asked the forensic anthropologists teaching the course how they identified the fourth rib and most of them said that they seriated the whole set in order to do so. I was momentarily taken aback until I realized that they more frequently handle relatively complete individuals, in situations where commingling is not an issue. The lesson here is that even when it comes to osteology, you have to choose your methods based on the materials at hand and your analytical goals. Later that day Hugh Berryman told us that he taught himself to identify, seriate and side ribs with his eyes closed in the darkness beneath his desk, so that he could pass his DABFA exam. Forensic anthropologists are a different breed.]

Ribs_1BUT I DIGRESS. The length and dimensions of ribs rarely allow for great preservation, so when you find them in archaeological contexts they tend to be extremely fragmentary. Unfortunately, in contrast to the shaft fragments of long bones which often come complete with nutrient foramina, muscle attachment sites or characteristic cross-sectional dimensions, shaft fragments of ribs are relatively homogenous. There are, however, a few tricks that you can use to help yourself orient and side ribs, even if you’re working with smaller portions.

As a quick guide to orientation in SAP, the most proximal portion of the rib, containing the head, neck and articular tubercle, (for ribs 1-10) articulates with the facets of your thoracic vertebrae, while the more distal, flatter and more regular portion of the rib articulates with the sternum or cartilage (or floats freely). The ribs are numbered from top to bottom, so 1 is the most superior and 12 is the most inferior. In terms of orientation, reach your hands out in front of you as if to hug someone standing in front of you. That’s effectively how your ribs are positioned. Importantly, the curvature of the ribs changes from flat to curving downwards as you move inferiorly down the rib cage. The first and second rib give something of an awkward “slow song at a middle-school dance” kind of a hug, while the lower ribs provide a more comfortable and self-assured embrace.

  • Ribs 1-7 articulate posteriorly with  with the demifacets and transverse processes of your thoracic vertebrae, and anteriorly with your sternum;
  • Ribs 8-10 articulate with your thoracic vertebrae posteriorly, and cartilage connected to the sternum anteriorly;
  • Ribs 11-12 articulate with your thoracic vertebrae posteriorly, and nothing anteriorly. They are appropriately known as the ‘floating ribs’.

central_rib

1. Orienting the tubercles: If you’re attempting to side a rib based on an isolated head, the tubercle is  posterior and somewhat inferior. The only exception to this rule is the first rib, where the tubercle is more superior. The first rib, just fyi, is kind of like the strepsirrhine primate of the rib cage – normal rules do not apply.

2. Orienting the sternal end: If all you’ve got is the sternal end of a rib, place it against your thumb. For ribs 8-12, this should slant downwards.

3. Figuring out which end is up (superior-inferior): A depression aptly named the costal groove runs along the underside of each rib. It is broader and more  defined posteriorly (towards the head of the rib). In life, the costal groove houses a neurovascular bundle containing the intercostal vessels and intercostal nerve…and when I just looked this up to verify, I remembered having to learn the mnemonic VAN to describe them in Gross Anatomy (since moving superiorly to inferiorly you have the Vein, Artery, and Nerve).

4. Special ribs: Ribs 1, 2, 10, 11 and 12 are a little bit different to the “regular” ribs I’ve described above. Their size, orientation and curvature are unique due to their anatomical position. Just so you don’t get overwhelmed (and because I am lazy),  I’ll save a post on them for sometime in the future…

References: 

ResearchBlogging.orgIscan, M., Loth, S., & Wright, R. (1984). Metamorphosis at the sternal rib end: A new method to estimate age at death in white males Metamorphosis at the sternal rib end: A new method to estimate age at death in white males., 65 (2), 147-156 DOI: 10.1002/ajpa.1330650206

Image Credits: Image of articulated rib cage found here. Image of central rib found here. All pictures of bones not credited were taken at the Museo de Jaén, Summer 2013.

Posted in Fragmentary Remains, Osteology, Ribs, Siding Tricks | Tagged , , , | 4 Comments

Get a leg up on the competition: Tips for identifying femoral shaft fragments

September is always a time of flux for grad students. It doesn’t matter how many years you’ve been in the program – there’s always some stressor that crops up in tandem with the start of a new school year. You could be TAing a new class, taking a seminar with a faculty member known for their withering remarks, meeting  an entirely new cohort, learning your way around a new town, or preparing a proposal for your committee to lovingly and tenderly eviscerate. Additionally, there’s the common panic of realizing that you did not get nearly as much accomplished over the summer as you thought you would. Unfortunately, these are not problems I can help you with.

What I CAN do, however, is teach you how to ID fragments of a femoral shaft relative to other long-bones. As I’ve mentioned before, fragments of long bone shafts can be particularly difficult to identify with confidence, because so much is contingent on an awareness of the shape of the shaft in cross-section. When I’m working with fragmentary and commingled long bones, I  begin by sorting the fragments by size – if you have circular shaft frags, you can use their diameter to quickly separate out large long bone fragments (femur, tibia, humerus) from small long bone fragments (fibula, radius, ulna). Similarly, thickness of the cortical bone and an estimation of diameter based on preserved shaft curvature (e.g. deciding how big the diameter of the bone is likely to be based on the portion you have) can be useful strategies.

Finally, the most telling feature of the femur is the linea aspera, a muscle attachment site that runs down the posterior surface of the shaft (see the Gray’s figure, above). It differs from the most rugose muscle attachment sites of the humeral and tibial shafts because follows a very straight trajectory down the posterior portion of the mid-femoral shaft. In contrast, both the soleal line (tibia) and deltoid tuberosity (humerus) have their own distinct curvatures, so they can be easily distinguished from the femur. However, if you’re dealing with smaller fragments of shaft, I made another “kindergarten fridge project” map of cross sections of the femoral shaft. The element pictured is a right femur, shown in posterior view.
Bone Broke – Tips for identifying femoral shaft fragments

Here’s a link to a PRINTABLE PDF as well.

If you too have fallen victim to early semester September stress, hopefully knowing how to identify femoral shaft fragments with ease will cheer you up. If not there’s always the fail safe late-afternoon combination of Coke Zero, pretzel m&ms, and watching clips of Jurassic Park on YouTube…

That Ian Malcolm. What a cad.

Image Credits: Figure of femur with muscle attachments found here. Original photo of femur taken at the Museo de Jaén, Summer 2013, updated with Inkscape figure June 2020.

Posted in Fragmentary Remains, Long Bones, Osteology | Tagged , , | 3 Comments

How to set up a spreadsheet like a boss

When I was applying to graduate school, I wish that someone had told me that it helps to either:

(a) have an extensive command of the intricacies of office software, or

(b) have a close friend who is an office wizard and willing to magnanimously spend their time and energy fixing your butchered documents.

For me, that person is my labmate Caroline, the Hermione Granger of office applications. I guess that makes me the Dobby. Or, even more accurately given my temperament, the Crookshanks.

In all fairness, I often walk around the lab making this exact face.

In all fairness, I frequently walk around the lab making this exact face.

I often sit in lab, staring at my screen while becoming increasingly frustrated with  [insert any of my datasets here] before finally abandoning hope and collapsing dramatically with my head on my desk. At this point, Caroline patiently asks me what the trouble is, and then comes over to teach me how to set up guides in powerpoint, or hyperlink to another location in a word document, or how to use v-lookup in spreadsheets. However, not all of us have a Caroline, and so I am going to give you a series of Excel shortcuts that I use when setting up my data collection spreadsheets. These are little tricks that make life infinitely easier, especially if you’re working with lots of spreadsheets on a daily basis, namely autofitting columns, freezing panes, and using the filter tool. While these shortcuts may seem obvious to Excel adepts, it took me a few years to pick all of them up and incorporate them into my daily routine. So, without further ado:

I. AUTOFIT COLUMNS: The first thing I do when setting up a new spreadsheet is copy-paste in my column headers and bold them. However, column sizes don’t automatically transfer between datasheets, which makes it seem like you’re forced to go through the annoying process of resizing all the columns manually so you can read everything. Not the case! To easily sidestep this issue, all you need to do is:

1. Paste your column headers into your new spreadsheet. Notice that some columns in my sample spreadsheet, like E, H and K, have text partially hidden, while others, like O through S, are so wide that they are wasting space.

2. Go to Format –> Colums –> Autofit Selection

How_to_auto_fit

3. Revel in the neatness of your newly autofit columns. Congratulations on the start of a beautiful spreadsheet!
Autofit


II. FREEZE PANES: While you’re no doubt extremely enthusiastic about your now OCD-compliant autofit columns, you may run into trouble if you’re entering many rows of data. I was always frustrated after getting past Row 37, the point at which your column headers scroll out of frame, because it’s easy to forget what all of the columns represent, forcing you to scroll back up to Row 1.

The problem - even though you can see the header for the first few rows of the sheet...

The problem – even though you can see the header for the first few rows of the sheet…

Your header row vanishes as soon as you scroll down far enough.

Your header row vanishes as soon as you scroll down far enough.

However, I  learned an Excel trick that remedies this problem: the Freeze Panes tool allows you to select a header row or rows, and keep them locked on top of the screen even while scrolling through other rows below. All you need to do is highlight the row UNDERNEATH the row(s) you want to act as your header, then go to Window –> Freeze Panes.

Freeze_Panes_Solution

As you can see, you’re now able to scroll down in your spreadsheet as far as you want with your header rows still visible! If you ever want to reverse this, simply highlight your frozen row and then backtrack along your previous steps by going to Window –> Unfreeze Panes.

As you can see, you can now scroll through your rows of data without ever losing your header row.

You can now scroll through your rows of data without ever losing your header row.


III. FILTER: Now that your spreadsheet is beautifully formatted and easy to navigate, you may want to isolate certain sections of your data. For example, let’s say you’ve become passionately obsessed with tarsal bones, and are consequently only interested in examining  the feet recovered from your cemetery. In this situation, you will want to:

1. Activate the filter tool by clicking the filter icon, indicated below. 

Filter_ToolActivating the filter means that you can isolate specific types of data by using the drop-down menu in any of the columns.

2. In this case, because you only want to look at foot bones, you’d go to Column H “Anatomical Region”, uncheck  “Select All“, and then check the box next to the “Foot” identifier. This will give you a list of all of the rows that have the identifier “foot” in Column H.

Filter_Feet

As you can imagine, you can use the filter for any of your columns – for example, if you only wanted to look at bones that were sided as rights, or all bones that were examined on the 16th of June, you could do that too. The filter tool makes it very  easy to search through your data and isolate specific types of information. Importantly, the filter doesn’t delete all of the unchecked rows – to turn it off and have your spreadsheet appear as it did originally, simply click the filter icon a second time.

And that’s how you set up a spreadsheet, like a boss. If anyone’s interested I can do another Excel post in the future, covering a few simple formulae and and my favorite tool of all, the pivot table. Happy data entry!

Image Credits: Photo of Crookshanks found here.

Posted in Data Collection, Dissertation, Equipment, Grad School, Impending Doom | Tagged , , , | 2 Comments

OsteoMenagerie 6: Tips for Siding the Calcaneus

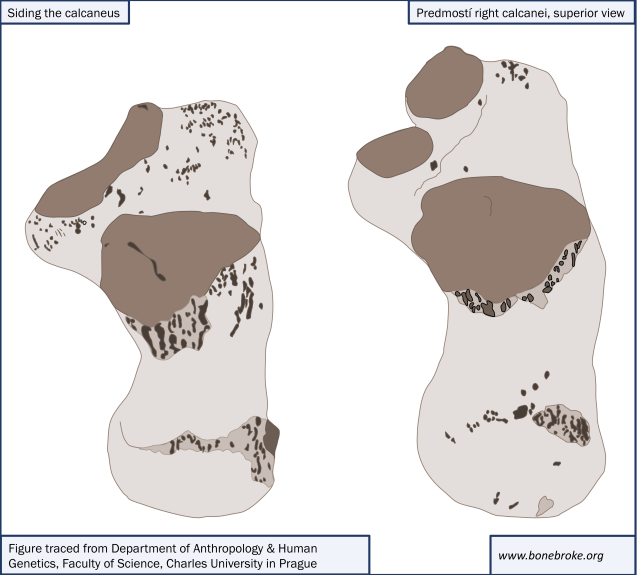
The calcaneus, often colloquially referred to as the ‘heel bone’, is the largest tarsal in the human foot. It preserves relatively well archaeologically speaking, appearing both in individual cemetery burials and in commingled graves. The photo below is of a specimen from Predmostí, a Gravettian site in the Czech Republic dated to 24-27,000 BP!

19. Calcaneal siding 1

In my experience, preservation of the calcaneus tends to be poorest posteriorly, in the region of the calcaneal tuberosity, whose rugose and irregular surface conceals a fairly broad expanse of fragile cancellous bone that is often subject to taphonomic damage. In contrast, the anterior portion of the bone, particularly the anterior, middle and posterior articular facets for the talus, is often relatively well preserved. However, the underlying form and structure of the posterior half of the calcaneus can be preserved even when the compact surface bone has degraded. Accordingly, it’s important to be able to side the calcaneus based on both (i) its overall shape and (ii) partially preserved portions of the articular facets for the talus. Once I’ve realized I’m dealing with a calcaneus, I start by orienting the bone is relative to my own feet, with the massive calcaneal tuberosity situated posteriorly and the characteristically smooth articular facets for the talus positioned anteriorly and medially when seen in superior view. However, if you’re having trouble with orientation while starting to learn your way around the oft-tricky tarsals, I’ve got a few shortcuts…

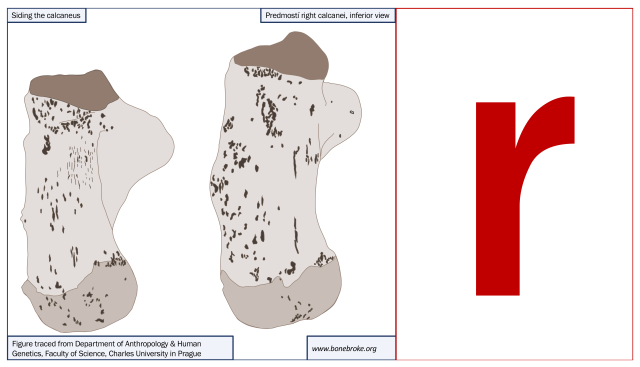
1. Siding the calcaneus based on its overall shape: If the overall calcaneal form is relatively well-preserved, but the articular facets themselves have degraded or have been caked with intractable sediment, the easiest way to side the bone is, somewhat counter-intuitively, to flip it over. Lay the bone on a table in front of you so that the rugose inferior surface of the bone is facing up, the more regularly oval shape of the bone’s posterior portion stretches toward you and the branching irregular ‘arms’ of the sustentaculum tali and trochlear process stretch away from you. The sustentacular sulcus for the flexor hallucis longus tendon should be facing up (see White & Folkens HBM p.294 for a refresher if you need a good photo of this feature). When the bone is oriented in this position, it will form the shape of a lower-case “r” when the bone is from the right.

19. Calcaneal siding inferior - letter r

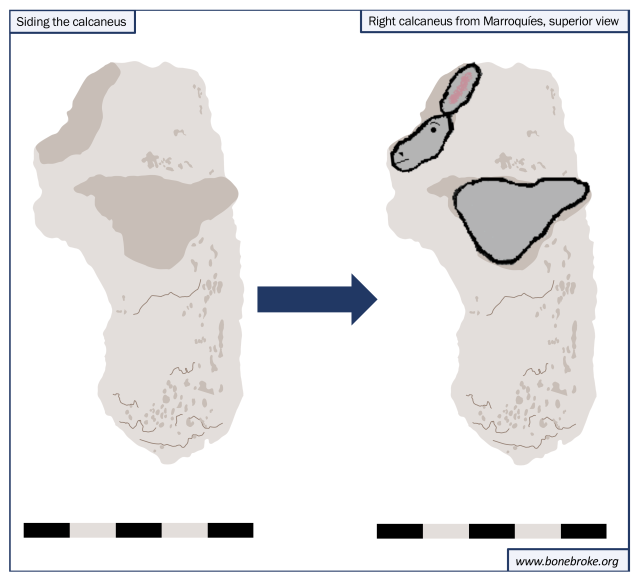
2. Siding the calcaneus based on the orientation of the articular facets for the talus: If the articular facets for the talus are well preserved, I  have an OsteoMenagerie trick that you can’t unsee after you’ve seen it for the first time (Editor’s Note: In case you were wondering, I do have a tendency to sit around looking at photos of bones in my spare time. Clearly I gotta get out more). The orientation of the articular facets for the talus resembles a donkey – the anterior articular facet is an ear, the middle articular facet is the head, and the posterior articular facet is the body. In order to use this trick for siding, just remember that in superior view, the two donkeys will face each other (or stare at a line in between your ankles) Witness:
This trick works relatively well even if the specimen isn’t a beautiful anatomy illustration like the calcaneus shown above. I tried using it on a photo of one of my archaeological specimens, and it still worked – despite slight variations in the size and form of the articular facets, most of the time you will be able to make out the shape of the donkey.
19. Calcaneal siding 3

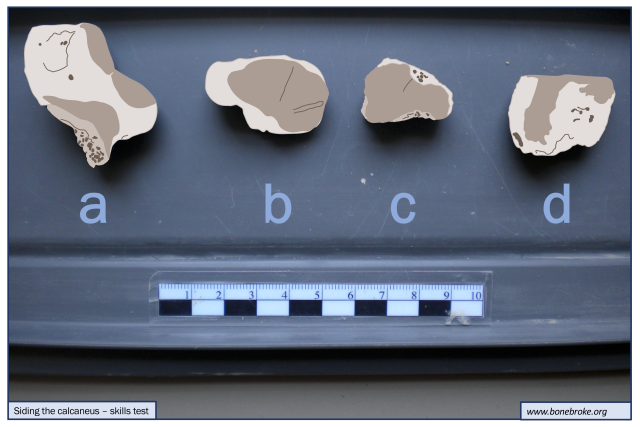
3. Test your knowledge: If you have an upcoming tarsal quiz, test your newfound knowledge of calcaneal siding by correctly identifying the following in the photo below:

19. Calcaneal siding skills test

(i) which of the labelled bones (a, b, c or d) is a calcaneus;

(ii) the anatomical region (anterior, posterior, medial, lateral, etc) that the calcaneal fragment is from;

(iii) the side the calcaneus is from.

IMAGE CREDITS: The figures showing the superior and inferior views of the Predmostí calcanei are taken from photos posted here & here, respectively.  The original labelled illustration of the calcaneus was found here. The lower-case letter r was found here. All photos used to make the figures for this post (of the calcaneus and tarsals) were taken at the Museo de Jaén in Summer 2013.

Posted in Foot, Osteology, OsteoMenagerie, Siding Tricks, Tarsals, Test Your Skills | Tagged , | 5 Comments

Pack your bags: equipment you’ll need for bioarchaeology data collection

This past Friday I finished my preliminary season of dissertation data collection here in Jaén. After staggering, zombie-like, out of the museum, devouring a bocadillo that was approximately the size of my head and staring blankly at the wall for a few hours, I began to revive. I have learned many things this season. For example:

1. When in southern Spain, verbal communication should be as telegraphic as possible. Andalusians have an ingrained aversion to pronouncing every syllable in a phrase as it is written. If you say “ha-sta lu-e-go” they look at you like you’re a dog walking on its hind legs. “Ta luego” will garner you a certain amount of credibility. If you want to earn true autochthonous bonus points simply say “luego”. Similarly, “buena tarde” should always be shortened to “buena”.

2. Always make sure you have all of the teeth pulled before analyzing commingled skeletal remains.  Spend an extra hour going through all of the bags if necessary – you’ll thank yourself later.

3. If you are from North America, you’ll need to reduce your walking speeds to about 40% of your customary pace in order to survive in Spain. This was easy for me to do in Jaén, because most of the city is built on a precipitous incline, and I am blessed with abundant amounts of natural sloth. Recurring highs of 38˚C were also helpful in convincing me to move at a fraction of my usual pace whenever outside.

4. When conjoining or pair-matching commingled long bones, it helps to clean the bones as much as possible beforehand. Coloration of bone is often indicative of exposure to a particular taphonomic environment, and provides helpful visual hints as to likely matches. Also helpful: music and/or frequent cursing, depending on how many fragments you have.

While this list could go on and on, one of the truly useful things I have learned this season is what equipment is necessary for conducting bioarchaeological research efficiently and responsibly. Given that my Andalusian research tips are likely only to be appreciated by my Iberianist colleagues (to whom I say “Much like Sagres and Super Bock, Alhambra has a dark varietal – try it if you get the chance!”), I figured I’d share my revamped equipment list for any interested  bioarchaeologists setting off to do their own data collection soon. Some of these are items are likely obvious choices to pack (calipers, toothbrushes), but others took me a little while to figure out (whiteboard, keyboard protector), and I figured that other people might benefit from my slow learning process…..

Equipment List:

  • “Yup, that’s wood alright”. This identification would doubtless have been impossible without the use of a loupe.

    “Yup, that’s wood alright”. This identification would doubtless have been impossible without the use of a loupe.

    Hand magnifying lens (loupe): These are particularly useful for examining LEH, the edges of caries or fractures, and potential cutmarks or taphonomic damage to bone.  I found the lens I currently use at a Sunday street market in northern Italy – if you don’t want to go that far afield you can find a bunch of them available for purchase on Amazon.

  • Good calipers: I brought less than stellar lab calipers with me this season, and when a friend came to visit with his new pair of new Mitutoyo digital calipers I was very jealous. Invest in a good pair before starting your fieldwork.
  • Fragment sorting circles: As I’ve noted before in this post, I found this to be an extremely efficient method for sorting fragments. If you spend $2.00 and get them laminated at a photocopy/office supply place, you can re-use them for multiple seasons.
  • Photo scales: I emailed our archaeology museum list-serv requesting photo-scales and got a number of different pdfs of typical 10cm and 5cm scales. I had these laminated like my fragment sorting circles, but next year I will likely invest in some real ones. I’ve found that laminated scales don’t always react well to being photographed, and occasionally show up on the edge of pictures as blinding flashes of light. A friend of mine recommended these ones as being a reliable and cost-effective choice.
  • Toothbrushes: not just for good dental hygiene.

    Toothbrushes: not just for good dental hygiene.

    Dental picks, toothbrushes and toothpicks: These are useful tools for getting dirt or chunks of sediment off of dirty bone. You can never have too many toothpicks. My lab curates a motely collection of dental picks free for the asking, but I know a number of archaeologists who have gotten them free from dentists after explaining their life choices (and consequent need for arcane equipment) to the fascinated medical professionals.

  • Keyboard Protector: These cost < 2 dollars online and are definitely worth it. I’ve used mine since Kampsville, and it has greatly prolonged the life of my laptop by preventing bone-dust and dirt from infiltrating the keyboard. It also means that you don’t have to clean your computer every single day if you enter data directly as you’re collecting it, the way I do.
  • Camera tripod: I wish I’d brought mine, especially for taking photos on macro settings that require more of a steady hand than I am capable of at 2:00 pm! I have a gorillapod that  I plan on bringing with me next year.
  • Small whiteboard with dry erase marker: This was key for taking photos quickly while also documenting specimen provenience. Whenever possible I tried to jot down any relevant provenience info before snapping a photo. Photos can always be cropped, and in the event that any sort of computer emergency occurs, this practice will allow me to retrace my steps and figure out what specific photos depict.
Item:  Provenience:

Item: Beleaguered grad student
Provenience: Michigan

  • Small cooking sieve: This was particularly useful for quickly dry-screening small bags of remains that had a lot of loose dirt in them.
  • Sharpies: As an archaeologist, I am of course addicted to Sharpies. You can never have too many of them. Be sure, however, to never confuse your sharpie with your dry-erase marker for your white-board. I waited with bated breath all season and I was fairly convinced I was going to do that at least once, but my whiteboard survived unscathed.
  • Sand: Though some of my paleo-buddies have apparently been using this trick for years, it took me awhile to figure out. If you want to take a high-quality photo of bone that requires orientation and support, just dump some sand in a box and use it to prop the element up. Some people use play-dough, but I find that has a tendency to stick to bones and create more of a mess than its worth. Sand is cheap, durable, and easy on the bones.
  • Human Bone Manual + Standards: These are my go-to reference manuals of choice for bioarchaeology. I scanned my copy of Standards so that I have a pdf as well. I’m surprised at how much I still rely on both volumes, and how versatile they continue to prove themselves. Whenever I have a question on metrics, scoring, or documentation, Standards is my first resource, and if I’m having trouble siding something, despite my considerable bag of osteo-tricks, Tim White’s tips are often indispensable.

HBM_&_Standards

  • Museum quality plastic bags, varying sizes: I was fortunate enough to work in a very well-equipped and generous museum, but if you need to rebag cleaned materials, leave notes in bags of bone (that need to be packaged in some form of plastic ere they molder and disintegrate) or separate out your dentition, you’ll want to bring some bags with you.
  • External Hard Drive: If you are writing a dissertation on any topic, BACK THINGS UP. This is not specific to bioarchs. It’s well worth the investment. My computer started staggering towards the end of my season, weighted down by the pernicious albatross of many, many high-definition photos of bone. External hard drives are useful for both backing your work up and providing you a storage place for extra material (scans of maps, site reports, etc) that you may need to take back home with you.
  • Music: Bring. a. lot. of. music. The one thing about bioarchaeology data collection that can be unexpectedly disconcerting for dirt archaeologists is the amount of time you spend alone. And also the amount of time you spend indoors – as I was telling one of my friends recently, this is the least amount of time I’ve spent outside in the past six or seven summers. Music or podcasts can help remedy both of those problems.

Alright. Time to go enjoy some post-dissertation travel on the eastern steppe. If anyone’s interested I can also post a list of essential equipment for field archaeology sometime in the future. Lemme know!

Photo Credits: Photo of “Identifying Wood” textbook found here: , Images of bioarch reference manuals found here  and here .

Posted in Data Collection, Dissertation, Equipment | Tagged , , | 4 Comments

OsteoMenagerie 5: The pisiform

The pisiform is one of the smallest bones you’re likely to come across when dealing with archaeological remains (though I once found one of the auditory ossicles when excavating a commingled burial site in Portugal – that was an exciting afternoon, lemme tell you); as such, it can occasionally be confused with the smaller, unnamed sesamoid bones of the hand or foot. If you have a particularly devious individual compiling your bone quizzes, it pays to know the difference. Luckily, a few simple tips can help you tell the distinguish the pisiform from impostor sesamoids.

First and foremost, the pisiform bears a striking resemblance to one of our great American megafauna: the bison. To wit:

Left: The right pisiform, from various angles. Right: The majestic bison.

Left: The right pisiform, from various angles.
Right: The majestic bison.

The tag “superior” in the set of drawings above refers to anterior view in SAP – basically, it’s what you would see if you flipped your palm up in supination and looked down at your carpals. To orient you, from this perspective the pisiform will be sitting on the side of your wrist that is closest to Ray 5, your little finger.

That's a delicious salted caramel from Madrid, in case inquiring minds were wondering.The rugose, ‘superior’ surface of the pisiform visible in this view is suggestive of the hump and head of a bison. While it’s easiest to see the bovid resemblance in proximal or distal view, another distinctive and diagnostic feature of the carpal is its round and decidedly flat articular surface for the triquetral.

For_triquetralThis facet will help even the novice osteologist distinguish the pisiform from its most pernicious mimics, namely:

(i) The lunate:  The lunate’s concave articular facet for the capitate is easily distinguised from the flattened, circular or oval facet for the triquetral on the pisiform.  Also, the lunate will be much larger.                                  (ii) Sesamoids: The various small sesamoid bones of the hands and feet  are much less regular in form, and lack this distinctively flat articular surface

Siding Tips: Unfortunately, I’ve never found a reliable method for siding the pisiform, and I have yet to meet an osteologist who is passionately invested in discovering one. In his description of the pisiform, White notes that “The morphological variation of this bone makes siding accurate in only about 85-90% of all cases” (White et al., 2012: 205).  He then provides a siding technique that doesn’t work on the bone photographed, which is telling. If Tim White doesn’t side something. I don’t side it either. JB out!

References

White, Tim D., Michael T. Black & Pieter Folkens. 2012. Human Osteology. 3rd Edition. Academic Press.

Images of bison found here: 1 & 2 & 3 & 4
Sketch of articular facet for triquetral  found here.

Posted in Carpals, Hand, Osteology, OsteoMenagerie | Tagged , , | 1 Comment

Hazards of Dissertation Data Collection

I sometimes get a little overly focused when collecting data. Kyphosis much?

I’m about to enter Week 10 of data collection here in Spain, and over the past month or so I’ve started to notice some unsettling trends.

  • I wear variations on the same two “nice-ish” outfits to the museum every day, and within half an hour of beginning work I am coated in dirt, water, bone dust, regular dust, or some novel combination of all four. I am starting to think that next summer it might be more efficient to just purchase a set of mechanic’s coveralls and have done with it.
  • I  have lost the ability to comport myself like an upstanding member of society. As soon as I get near bones, all social niceties are immediately abandoned – I sprawl out on the floor, ziploc bags of ulnae radiating out around me in disorganized spokes, or perch on top of cabinets, examining tooth cusps in the better light provided by the window that opens onto the street. Given my pallor and propensity for furrowing my brow when I’m identifying dentition, Spanish passerby have likely begun to believe sort of malevolent spirit is haunting their provincial museum, though no one has yet made the sign of the cross after seeing me.
  • As soon as I am left alone in a room I begin humming unconsciously. I think it is because I’ve been spending a lot of solo time in the basement, and this is my brain’s way of trying to convince itself there is another person present.
  • I become inordinately happy whenever my necropolis MNI goes up, for no real reason except that I have begun to equate more people with greater success – it’s kind of like a prehistoric mortuary version of the gold stars you used to get for good behavior in elementary school. “Another individual today! Wow, I feel great about myself!”
  • Perhaps as a result of the progressively increasing amount of dissertation-related isolation over the course of the summer, the hurried notes that I jot down at the end of the day have taken on a slightly animate, anthropomorphic tone. This, at least, is not entirely a recent trend (And I’m pretty sure the singular is “a caries” and not “a carie”, but give me a break – it was the end of the day!).

talking bones

  • As regards  domestic life, telling  highlights of  my increasing levels of distractedness this week  included:

(i) purchasing the incorrect size of lightbulb for a light in my apartment, and then unscrewing the wrong light fixture when trying to replace the bulb;
(ii) dumping a batch of oatmeal into a bowl of sauteed garlic and onions, instead of the bowl of chopped up apple next to it;
(iii) gratuitously over-seasoning every dinner of the week because I have, without fail, selected the large opening on the container of pepper every single time.

Your brain on your dissertation: not a pretty sight.

That said, I spent all of today listening to the Beatles, staring at site maps with my head tilted to one side, inventorying individual burials (very exciting as I’ve been working on collective, commingled material all summer), and six and a half hours just flew by. In fact, it was one of the best Fridays I’ve had in awhile. Hope your end of the week was just as enjoyable. And if you too are collecting data for your dissertation, may the odds be ever in your favor!

Posted in Dissertation, Grad School, Impending Doom | Tagged , , | 2 Comments

If you got a fragment, yo I’ll sort it

Apologies to Vanilla Ice.

There are around 206 bones in the adult human body. However, one of the joys* of working with prehistoric human remains is that taphonomy, mortuary practices and several thousand years worth of soil pressure all unite to produce a high degree of fragmentation of osteological material. As a result, when identifying and cataloguing archaeological human remains you’re likely to come across a vast number of fragments, some of which can’t be identified to a more specific level than “cranial vault fragment” or “large long bone fragment”. When you’re dealing with bags and bags of broken bones, it helps to have a strategy for quantifying and describing such fragments rapidly, so you can spend more time focusing on fun things like dentition, carpals, or your much anticipated daily trip to the little store across the street for a can of Coke Zero (that will remain ice cold for approximately 30 seconds, because this is Spain). Below, I outline my strategy for dealing with unidentifiable or ‘barely identifiable’ fragments, and include some practical tools that you can use when collecting data!

*Re: My use of the word “joy”

Fragment_Circles_Take_2

Fragment Size Sorting Circles: Don’t leave home without them.

In my research, I use a variation of the “zonation” method for recording fragments, a  personal hybrid of Knüsel & Outram’s 2004 method and Stodder & Osterholtz’s 2010 refinement thereof. Importantly, Knüsel and Outram underscore that when using their method: “All fragments, including those fragments that cannot be assigned to either element or taxon, are assigned to a fragment size category. The size categories are based on maximum dimension and are as follows: 0-20mm, 21-30mm, 31-40mm, 41-50mm, 51-60mm, 61-70mm, 71-80mm, 81-90mm, 91-100mm and 100+mm. In order to facilitate rapid recording, circles can be drawn on paper with a compass such that individual fragments can be placed within them to determine the category in which they belong. Counting can be done manually, or for large groups, with finger-operated mechanical counters” (Knüsel & Outram 2004: 87).

Here, I use a literary device known as

Here, I use a literary device known as “foreshadowing” to give you a hint as to how I feel about drawing compasses.

I have no idea what “finger-operated mechanical counters” are (some kind of Spanish Inquisition style torture device, by the sound of it), but before starting dissertation data collection I latched on to the idea of fragment sorting circles. “I’ll buy a compass!” I thought to myself excitedly. “This will be great fun! It will be like middle school art class or geometry all over again!”, conveniently forgetting my underwhelming performance in both of those subjects. A frustrating half an hour later, my redoubtable labmate Caroline grew tired of watching my increasingly theatrical and profanity-laced struggles with the cheap plastic drawing compass, and suggested I simply make the circles in Microsoft Word. Once she taught me how to set the size of an object in Office, I quickly made up a two-page sheet of sorting circles (Sidebar: I am apparently incapable of doing anything on my own. I’m concerned that soon my friends will get to the stage where they throw their hands in the air in exasperation, put me in a round room, and tell me to go find a corner). After printing out the circles, I had them laminated so that they could be reused all summer long without needing to be reprinted. Lamination also allows you to use the size sorting circles as sort of fragment funnel – you can just slide the bones into their bag when you’re done cataloguing them.

Once you have your size-sorting circles, the method is as follows. Identify your bone fragments to your requisite (or feasible)  level of specification – in my case this normally results in “long bone fragments”, “epiphyseal fragments”, “cranial fragments” and “general fragments”. Then:

Step 1: Sort the fragments into size categories;

Step 2: Count all fragments in a given size category;

Step 3: Weigh all fragments for each size category.

I only enter one row of data per category of fragment, and I’ve found that a column set-up like the one outlined below makes it easy to organize the counts for all ten different size categories as well as the weights of the affiliated bones, without making my spreadsheet too ridiculous. And BOOM. Your fragments have become data.

Fragment_Sorting_Excel
So that’s how I’ve been handling inventorying and cataloguing unidentifiable fragments during my first season of dissertation data collection. I’d be really interested to hear what strategies other bioarchaeologists use to deal with this issue. Thoughts anyone? I’ve also attached a Word and pdf version of my fragment size sorting circles, in case anyone else wants to use them for data collection. Happy sorting!

Fragment Size Sorting Circles.docx

Fragment Size Sorting Circles.pdf

Addendum: Thanks to Anna Waterman and Anna Osterholtz for their initial advice on the use of the zonation method.

References

ResearchBlogging.orgKnüsel, Christopher J., & Outram, Alan K. (2004). Fragmentation: The Zonation Method Applied to Fragmented Human Remains from Archaeological Contexts Environmental Archaeology, 9, 85-97 DOI: 10.1179/146141004790734513

A.L.W Stodder and A.J. Osterholtz. 2010. “Analysis of the Processed Human Remains from the Sacred Ridge Site: Methods and Data Collection Protocol.”  In E. Perry, A.Stodder, C. Bollong (eds.) Animas-La Plata Project. Vo. XV-Bioarchaeology. SWCA Anthropological Research Paper Number 10, pp. 243-278.

Original image of drawing compass found here: 1

Posted in Equipment, Fragmentary Remains | Tagged , , , | 1 Comment

OsteoMenagerie 4: The Capitate

I relabelled some of the carpal aritculations here. Who the devil uses "lesser muliangular" these days? The Brits?

Left: Darth Vader
Right: Left Capitate

Right Hand Palmar View

Like all carpals, the capitate possesses a distinctive, irregular shape that makes it easy to identify and side. Unlike the other carpals, however, the capitate happens to look like one of the most notorious villains in cinematic history: Lord Voldemort…Just checking that you’re paying attention!  The smooth, rounded head of the capitate (for articulation with the lunate & scaphoid)  is particularly difficult to confuse with any other carpal, and it provides a dead giveaway that you’re dealing with a member of the distal row of carpals.

Left: Left Capitate Right: Lord of the Sith

Left: Left Capitate
Right: Lord of the Sith

Siding Tricks: In order to orient yourself, the “helmet” (aka rounded articular surface for the lunate) will always be proximal. If you want to use the medial or lateral articulations to side the bone (for the hamate or the scaphoid + trapezoid respectively), orient the bone so that the helmet is pointing up, much like you’re looking at Lord Vader in profile. Then, rotate the bone so that the lateral surface faces you.  Two articular surfaces should be visible: an upper, rounder one for the scaphoid, and a lower, more horizontal one that slopes off to one side, for the trapezoid. The non-articular indentation between these will point towards the side the bone is from. The lowest border of the bone will point down and away from the side the bone is from. Or, as one of my friends memorably told me at Kampsville, the bone is from the direction that Darth Vader is facing.

Capitate_Siding

For your further edification, two important Vader-Related links. And, since I suppose Vader had wrists,  broadly speaking we can consider these carpal-related also. At least you can, if you need to justify a YouTube break as some form studying.

As an adept-level graduate school procrastinator, I myself have no need of such excuses.

1. The Vader Sessions: Just open it. Trust me.

2. Death Star Canteen: Eddie Izzard on one of life’s universal equalizers….the cafeteria line.

Original undoctored images found here: 1 & 2 & 3.

Posted in Carpals, Hand, OsteoMenagerie, Siding Tricks | Tagged , , | 6 Comments